In this article, you will learn:
How to build a traffic-ready, Pre, Mid or Post roll Instream ad unit
How to Configure the General Ad Settings for the VAST Ad Unit
How to Configure the Creatives > General Settings for the VAST Ad Unit
How to Configure the Creatives > Advanced Settings for the VAST Ad Unit
How to Add Closed Captions to the VAST Ad Unit
How to Add Third Party Tracking to the VAST Ad Unit
How to Preview the VAST Ad Unit
How to Add a VAST Ad Creative to a Campaign
How to View and Export VAST Tags for Trafficking
How to Edit, Preview, and Delete an Existing VAST Ad Unit
How to build a traffic-ready, Pre, Mid or Post roll Instream ad unit
Below you will find a step-by-step process to build an Instream Video Ad unit:
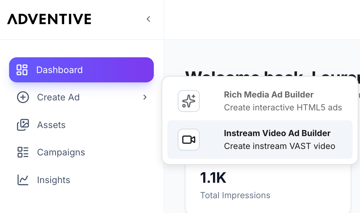
- Access the Instream Video Ad Builder via the main menu bar, within the Create Ad menu at the left side the console. Within the menu, you'll see two options: Rich Media Ad Builder and Instream Video Ad Builder.
Select Instream Video Ad Builder:
- This will take you to our VAST Ad Builder console:
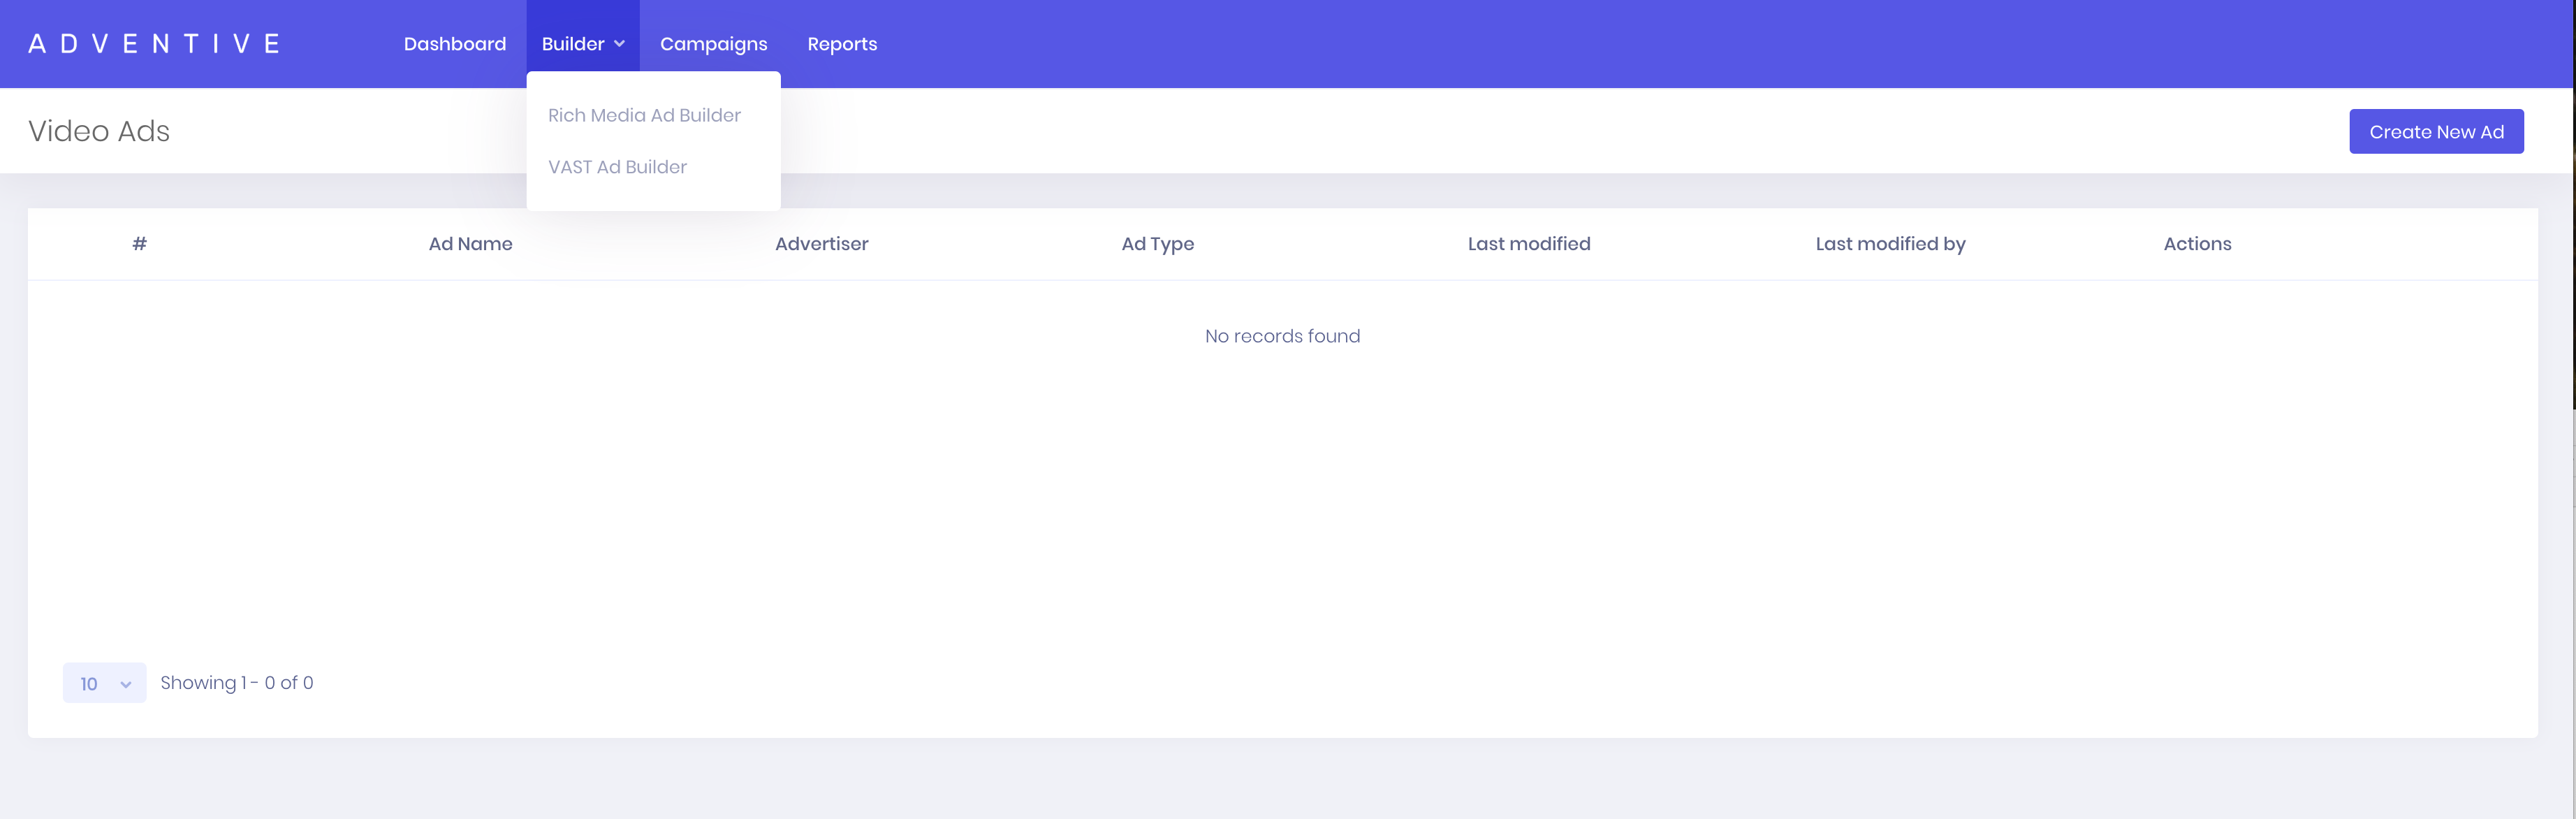
- If you have already built VAST video ads, any existing VAST Ad creatives will display here:

- Click "Create new ad" in the upper right-hand corner:

How to Configure the General Ad Settings for the VAST Ad Unit
- Provide a unique Name for the unit, and select the advertiser from the Advertiser dropdown menu:
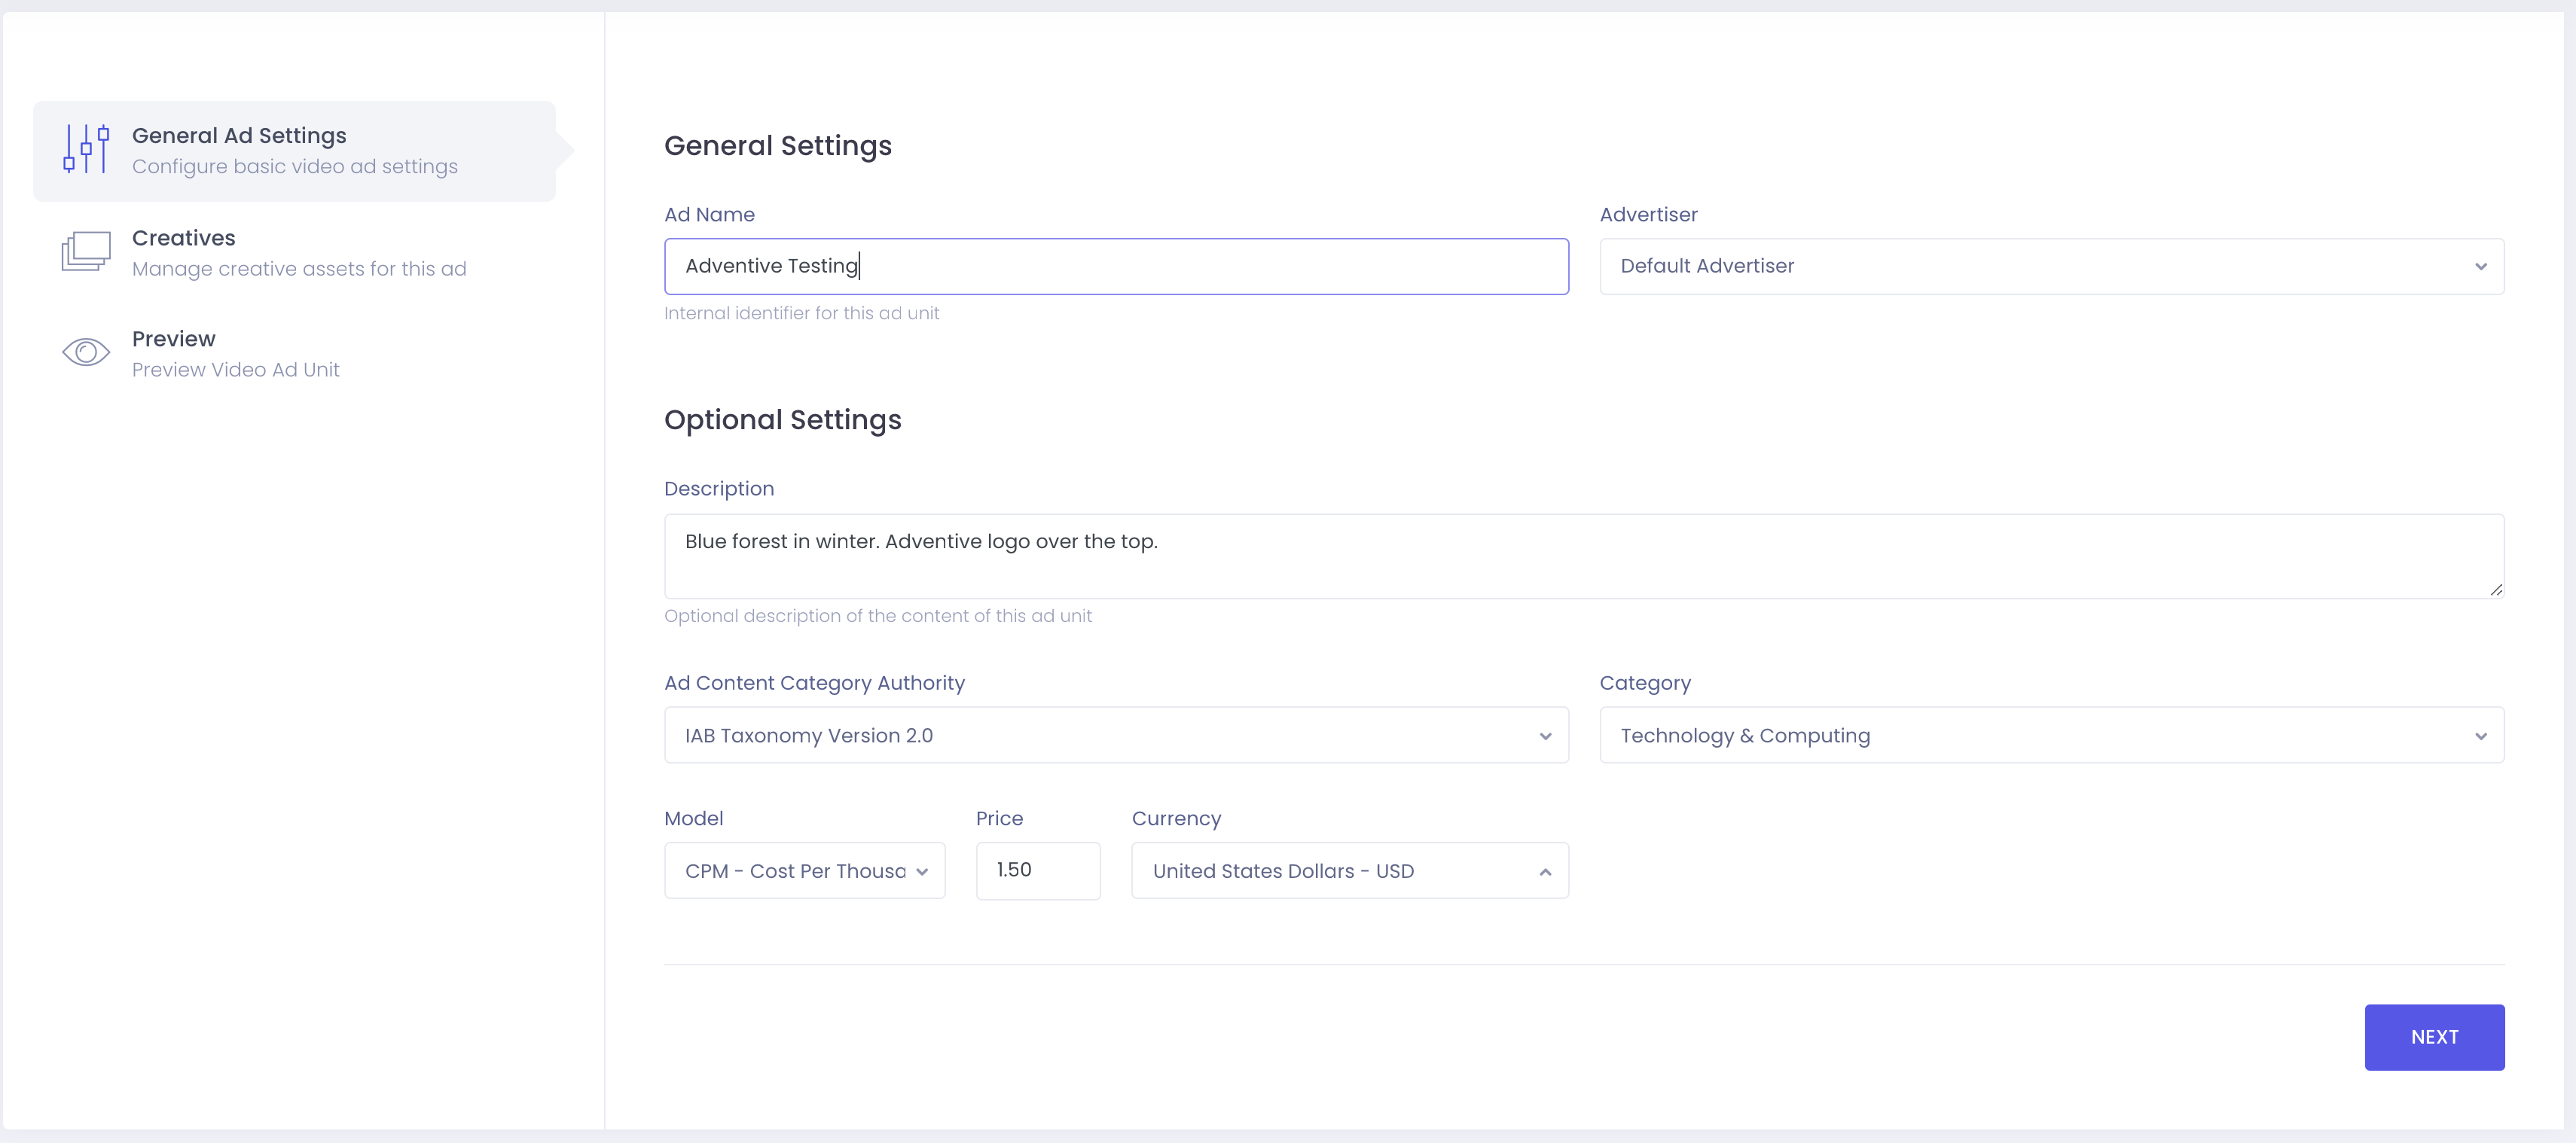
- Optionally, you may provide a description of the video ad, categorize the ad unit with industry standard taxonomies, and set a pricing model, price and currency for the unit:
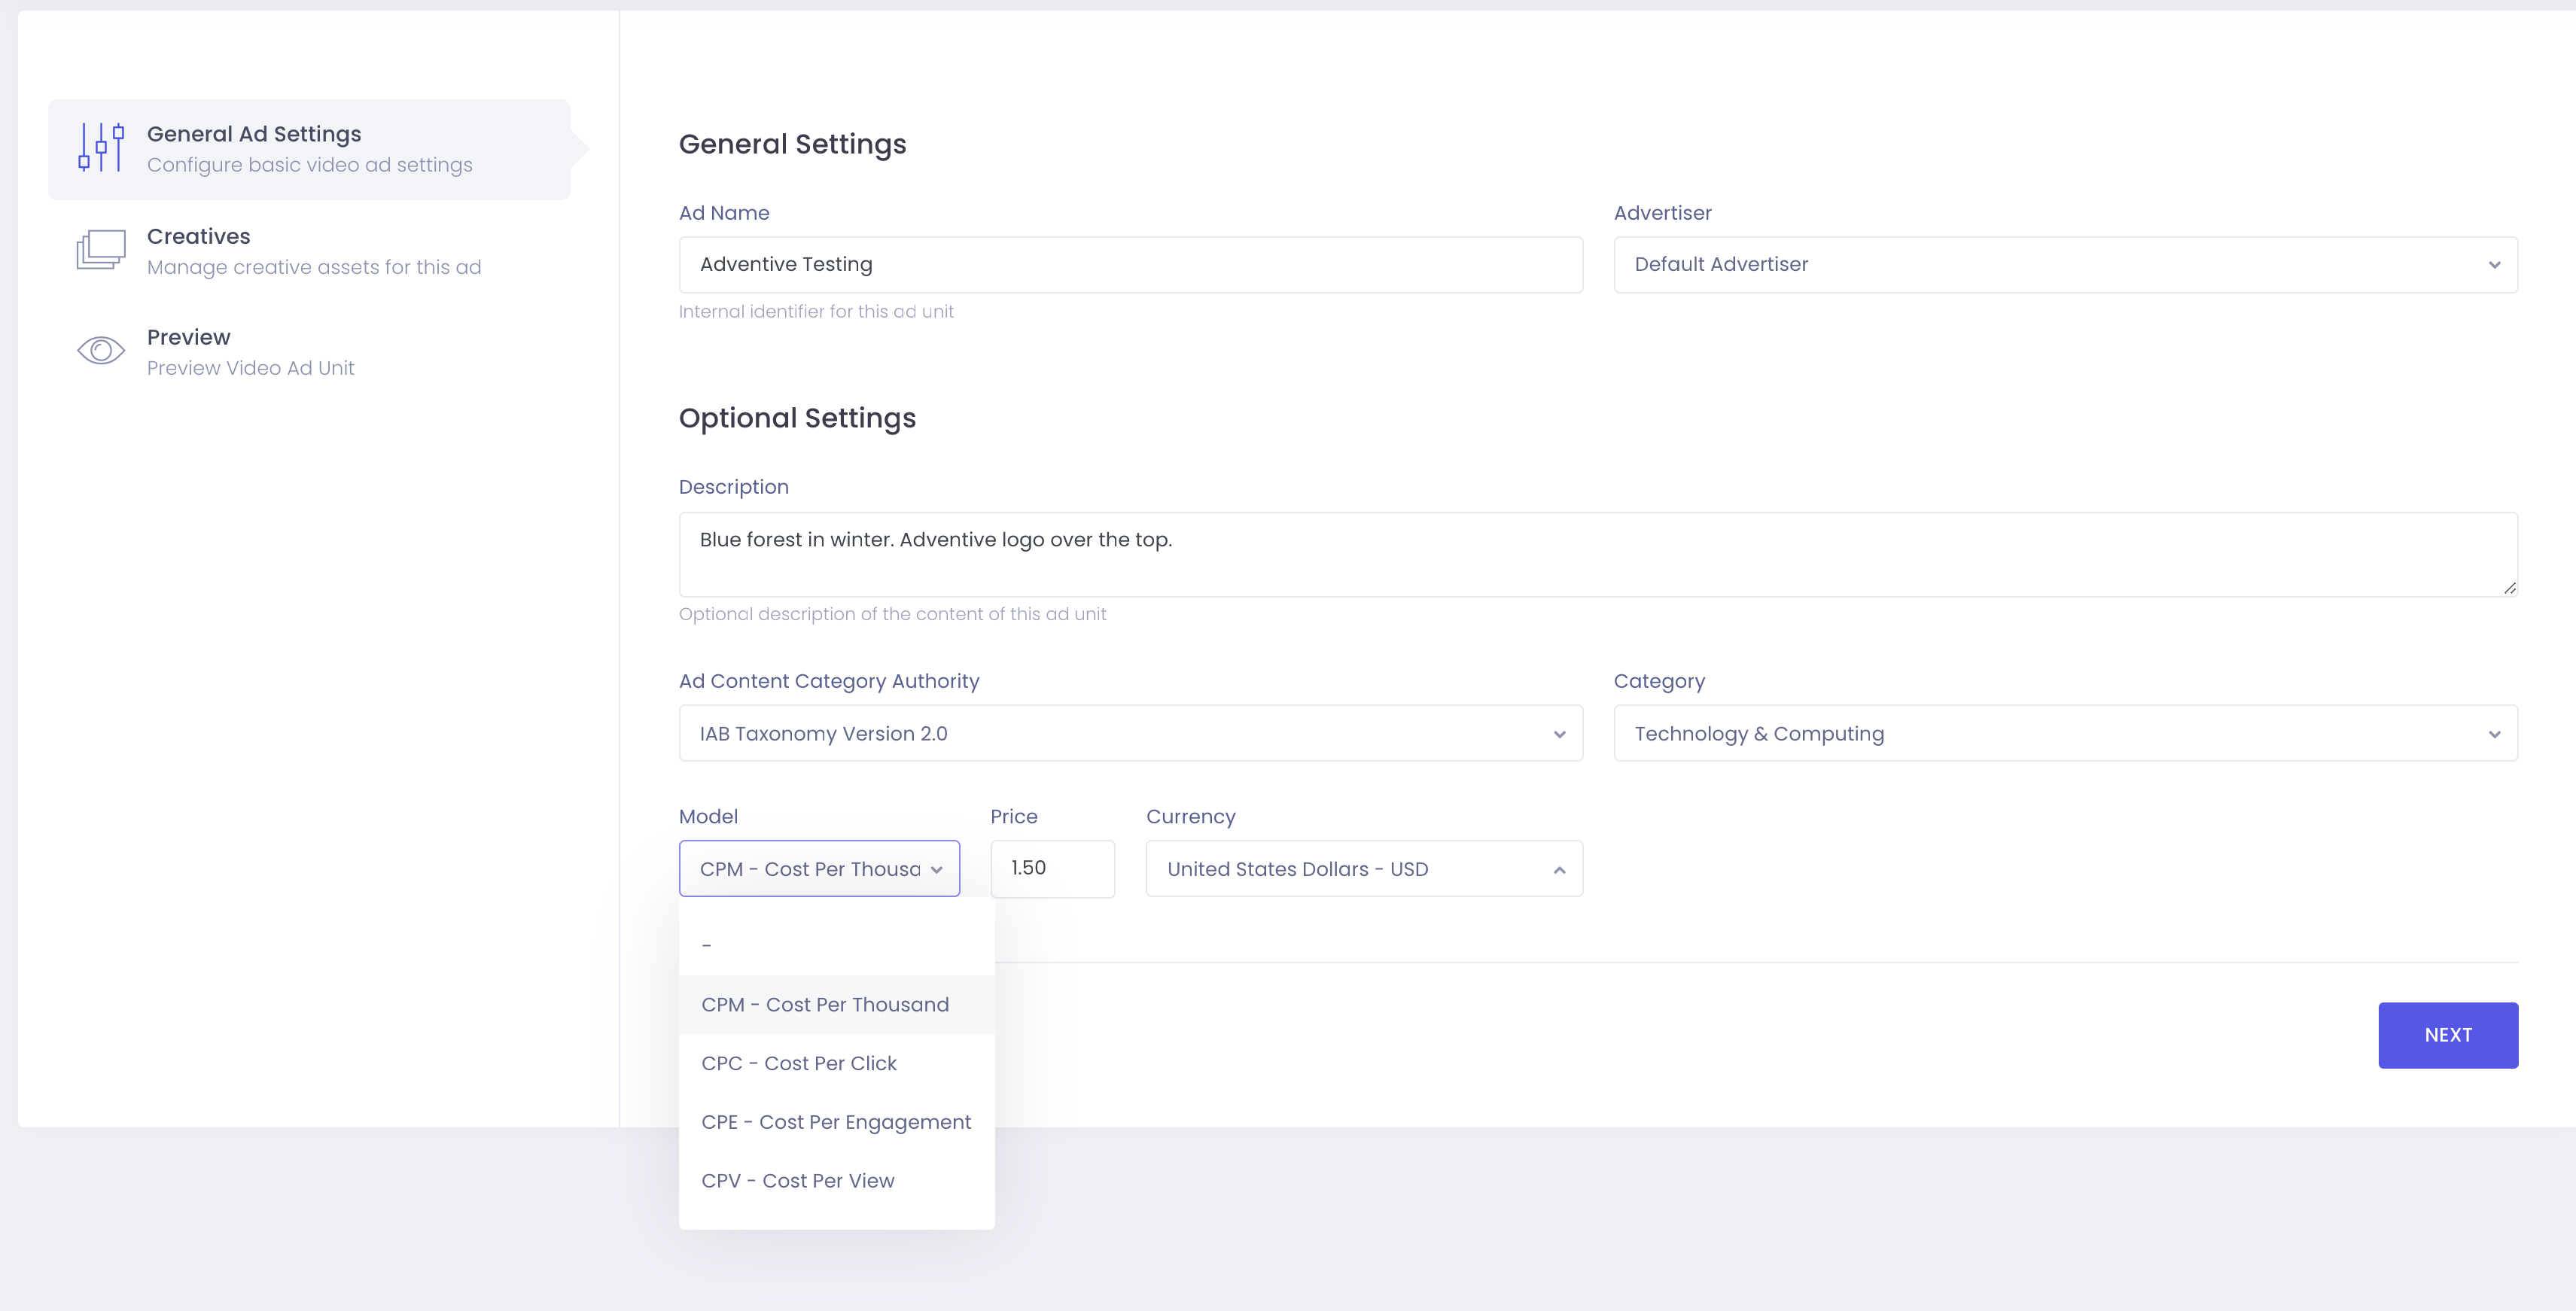
The VAST Video General Ad Settings are explained below:
Ad Name Create and name your ad. Advertiser Select an advertiser from your existing list. Description Add a description here with ad tags, and additional information. Ad Content Category Authority Select IAB Taxonomy Version 2.0 or "none". Category Classification of ad content. Model A dropdown menu to select model. CPM, CPC, CPE, or CPV. Price Enter the advertisement CPM/CPC/CPE/CPV cost. Currency Select the correct national currency for your CPM/CPC/CPE/CPV. -
Click Save in the top righthand corner to save your progress as you go:

-
When changes have been made, the icon will immediately change to an opaque "save" icon:

-
When no changes have been made, or the ad has been saved and is up-to-date, the "save" icon will be translucent:

-
If you attempt to exit with unsaved changes, you will be alerted with this window, where you will have the choice to "save" or "discard changes":

-
When you press "save" you will see a purple bar verifying that you saved successfully:

- Click Next, to proceed to the Creatives configuration screen.
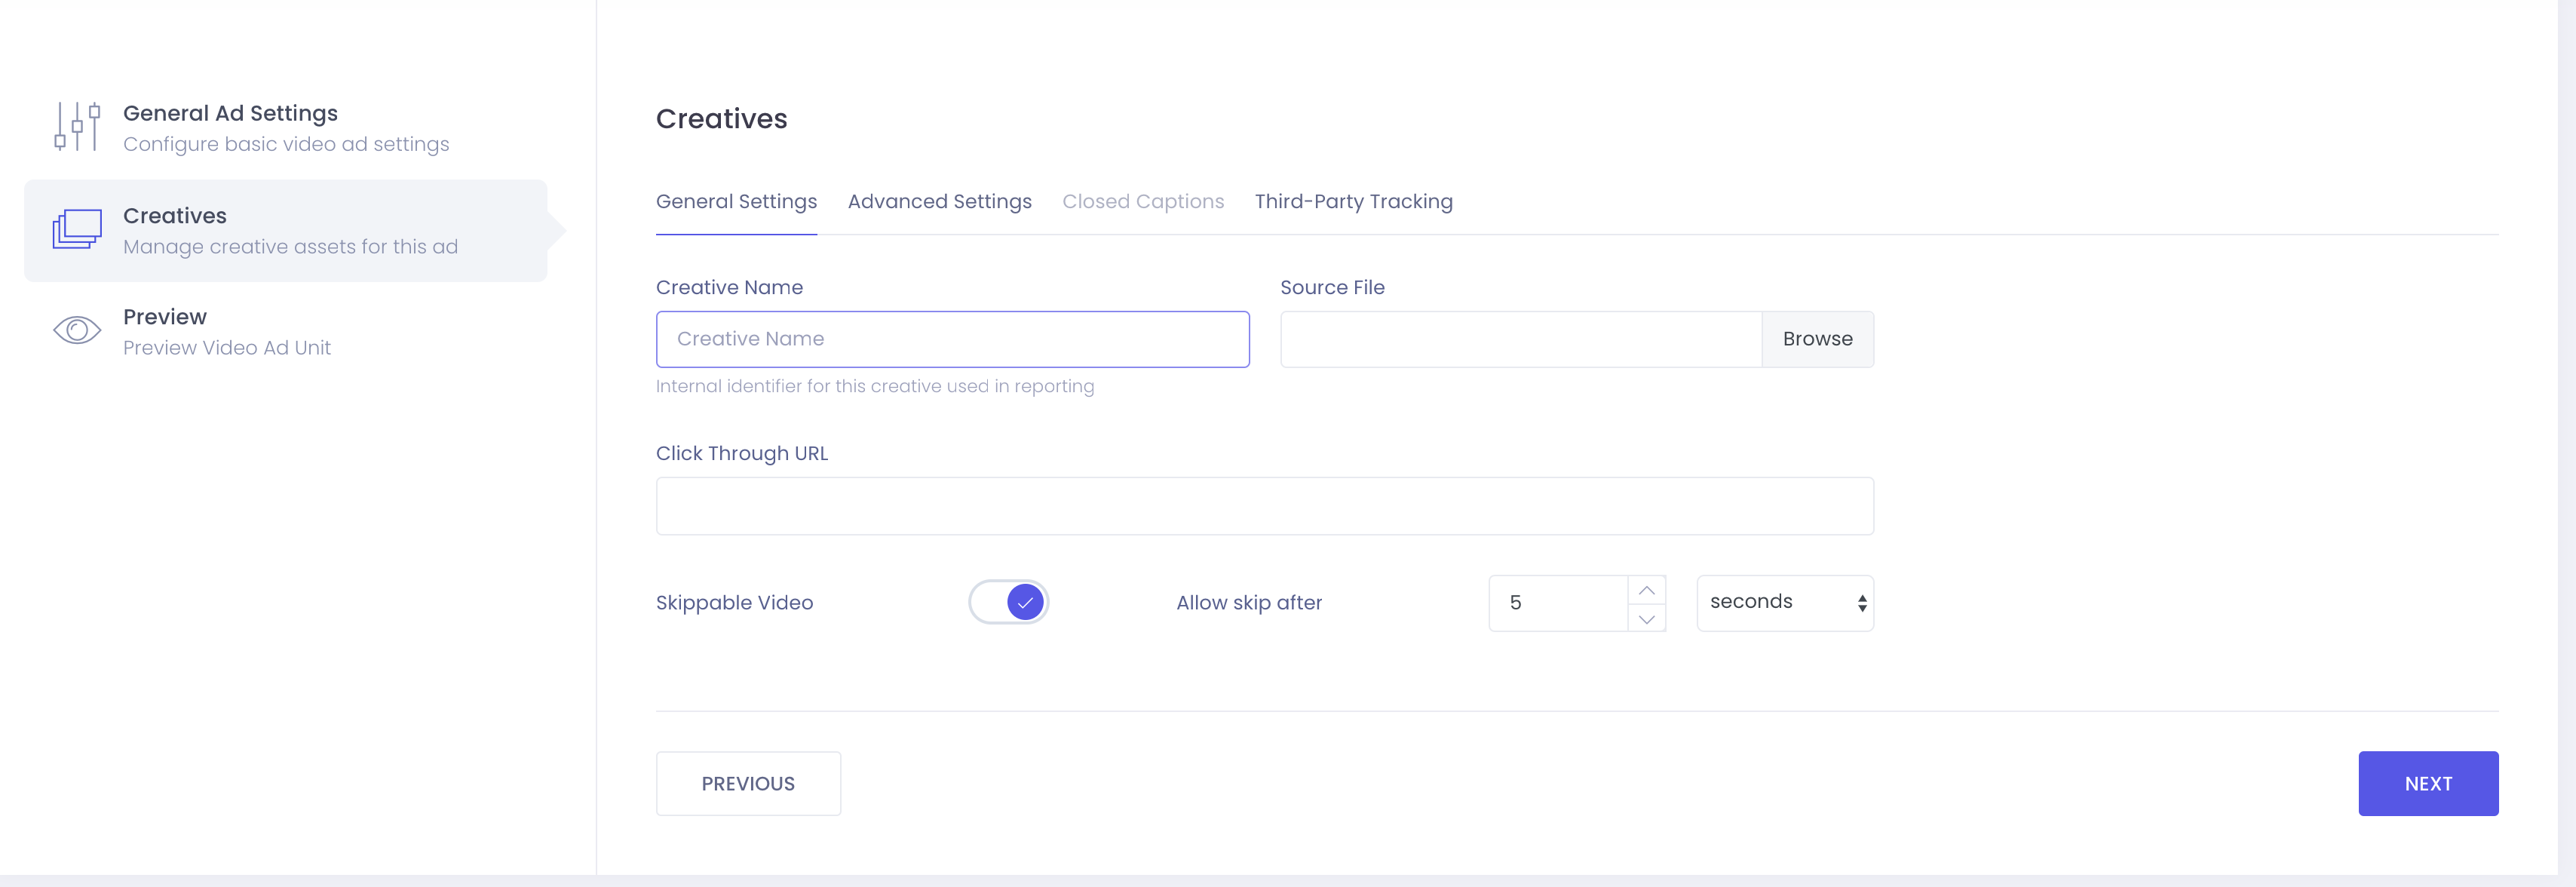
How to Configure the Creatives > General Settings for the VAST Ad Unit
The Creatives > General Settings screen provides you the ability to configure the settings on a creative by creative basis. To complete the creative configuration, follow the steps below:
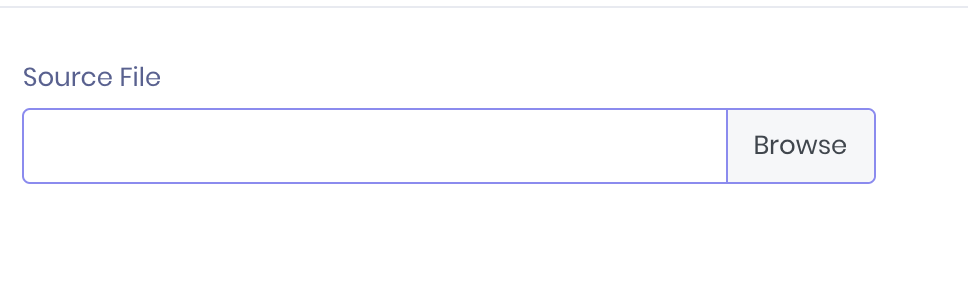
- Provide a unique Creative Name for the video, click browse and select the source video file from your workstation:
-
A window will pop up showing you your “Finder” if you use a mac, or your “File Explorer” on PC. Select the correct video file from your computer, and click “open”:

-
You will see a loading symbol on the right hand side, as well as a progress bar, indicating your video upload progress:

-
Once your source video has finished uploading, you will see a preview on the righthand side:

- Select the Click Through URL that you will link to when the video is clicked on or completed.
- Toggle the Skippable Video option depending on the requirements, and select a skip time or percentage of the video. If "Skippable Video" is selected, a "Skip Ad" box will appear on your video. The "Allow Skip After" setting allows you to set a specific time (in seconds) for viewing the video before the "Skip Ad" option appears:

- Once you have finished adjusting the General Settings, click the "Advanced Settings" tab.
Please note that Skippable Video parameters may be ignored by the primary ad server or ad network in which the video is displayed on. This feature provides the publisher with your 'desired' configuration, but may not be enforced based on the publishers requirements.
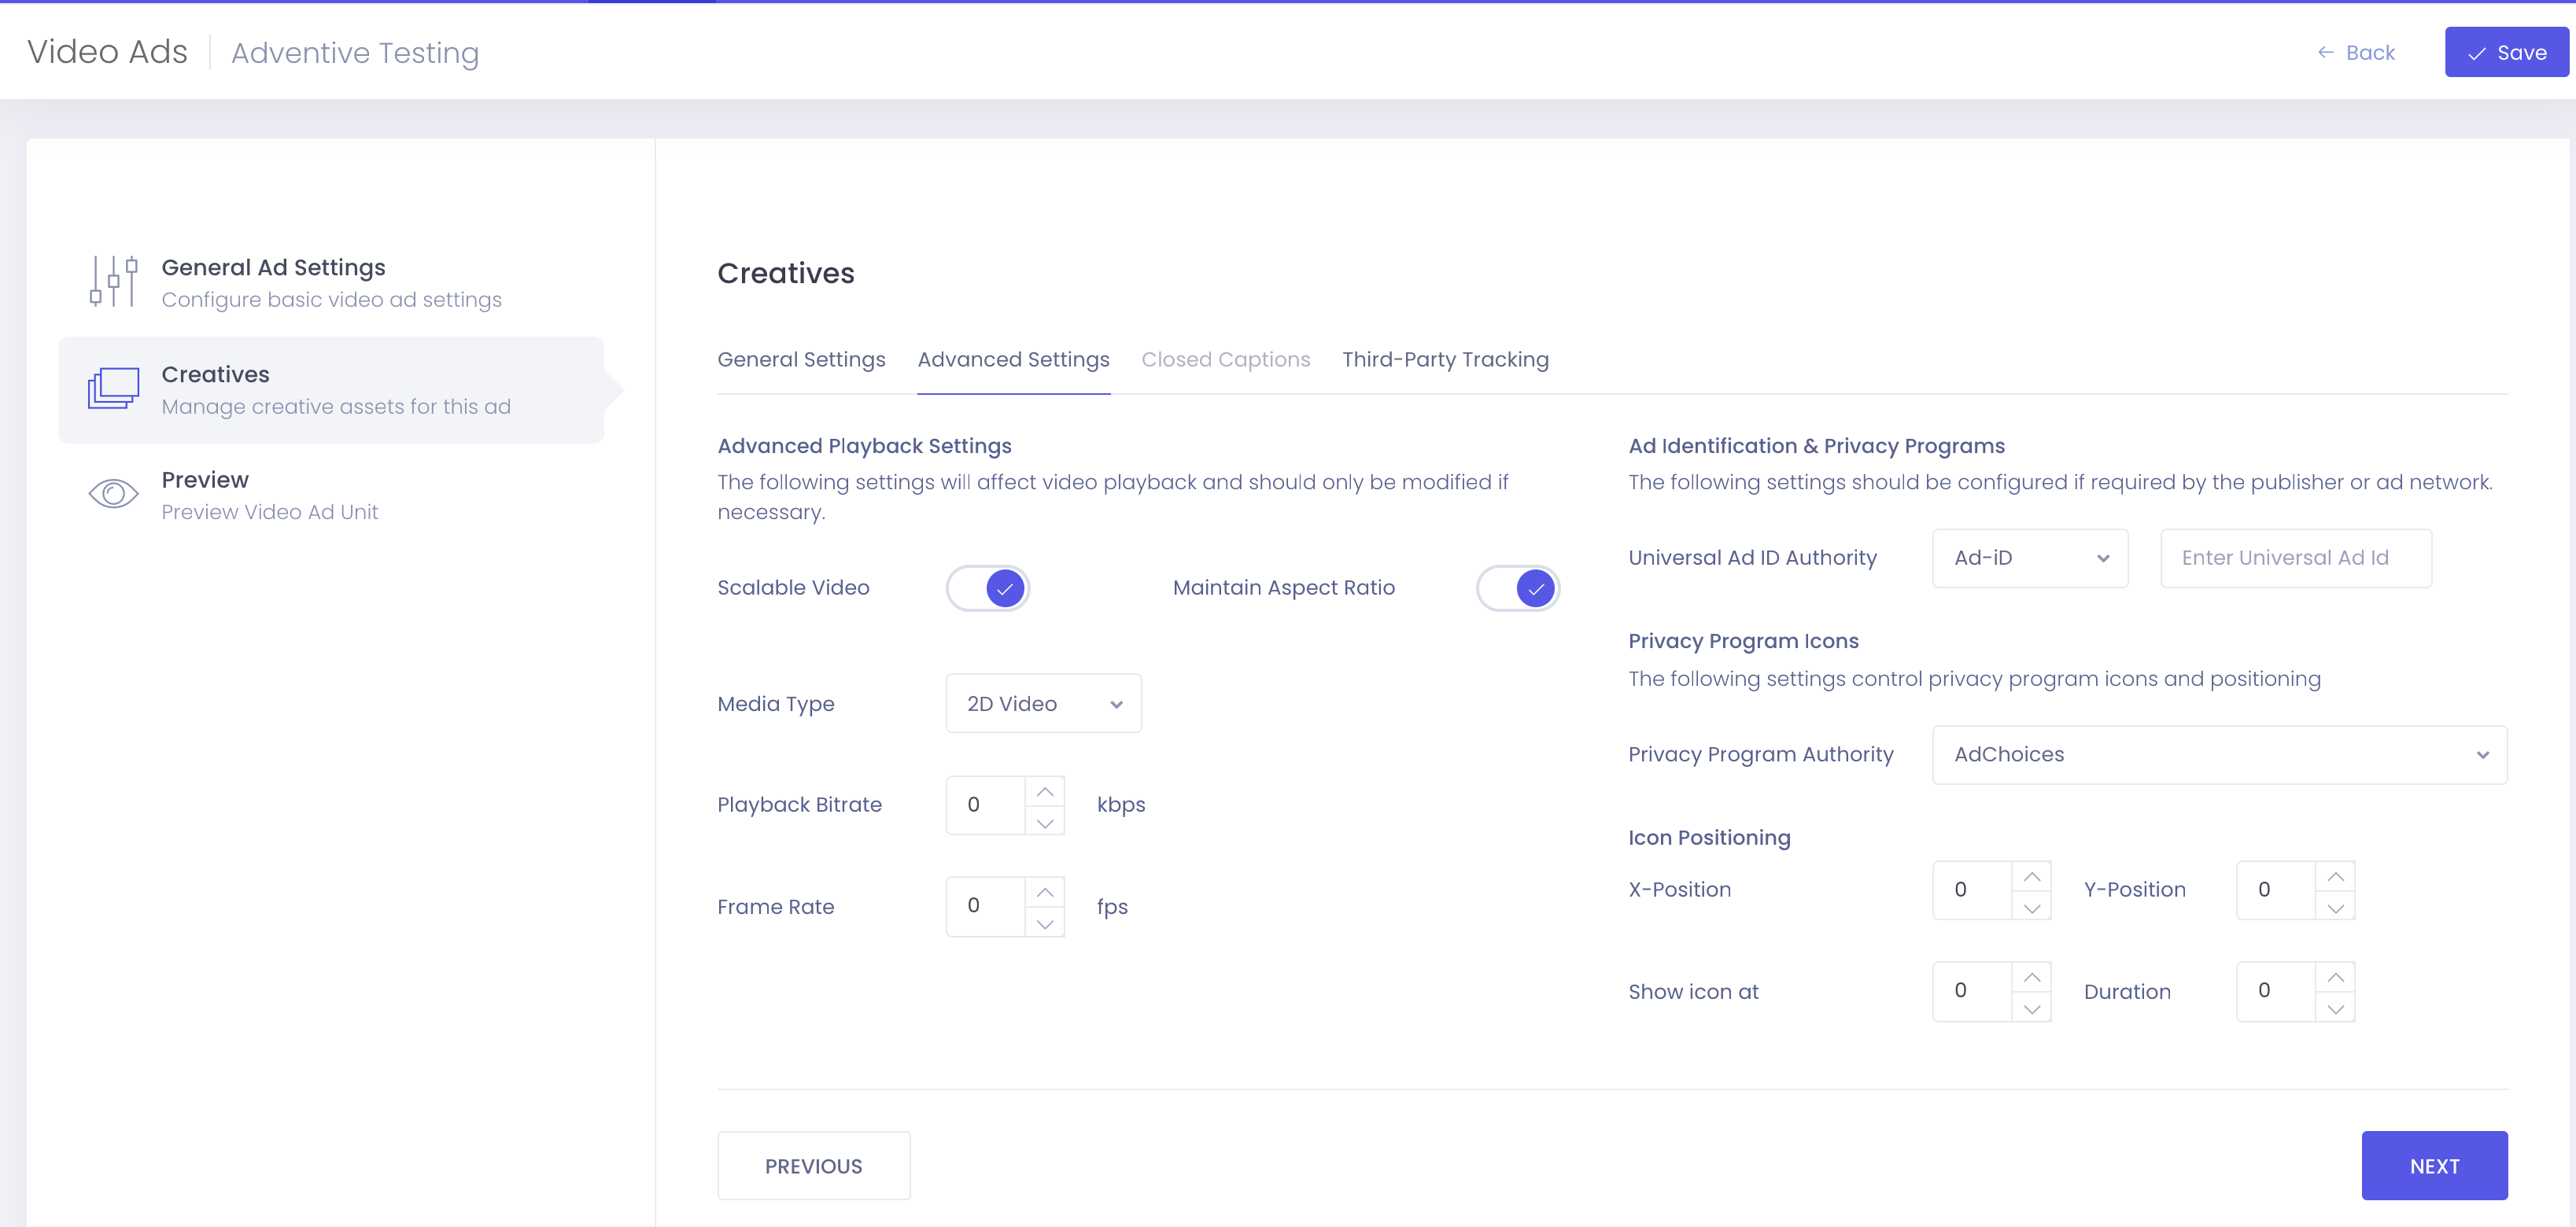
How to Configure the Creatives > Advanced Settings for the VAST Ad Unit
The Creatives > Advanced Settings screen provides additional parameters to modify the playback of the video, identification programs, and privacy icons.
These settings should NOT be modified unless instructed to do so by the publisher or ad network.

The VAST Creatives > Advanced Settings are explained below:
| Advanced Playback Settings | The following settings will affect video playback and should only be modified if necessary. |
| Scalable Video | Allows video to be resized based on viewer’s media platform (selected by default). |
| Maintain Aspect Ratio | Maintains correct ratio of height and width as video is scaled (selected by default). |
| Media type | You may select 2D, 3D, or 360 video. |
| Playback Bitrate | The number of bits that are processed in a unit of time. |
| Frame Rate |
Select your frame rate based on region, and how video was filmed. Standard sizes are 24fps (Cinema), 29.97fps (NTSC for TV/Broadcast) and 25fps (PAL). * Note - Bitrate and frame rate will be filled automatically based on the source video file. |
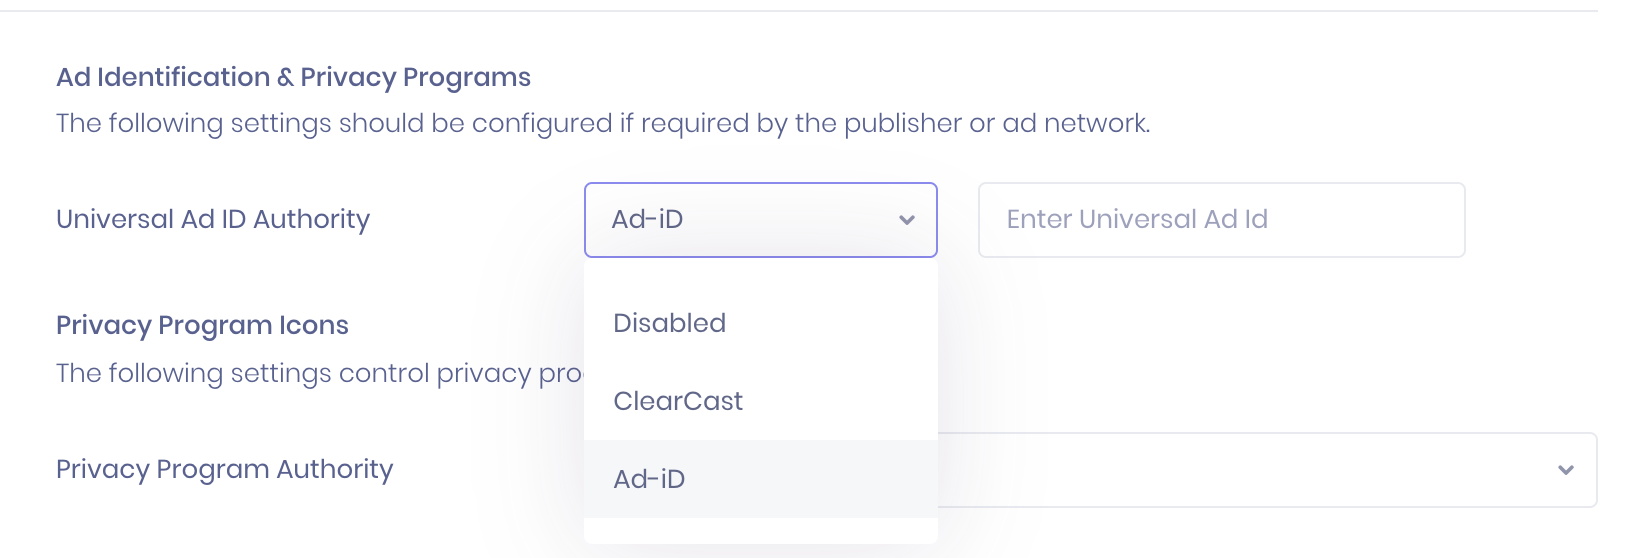
| Ad Identification & Privacy Programs |
The following settings should be configured if required by the publisher or ad network. VAST Ads are required to comply with the iAB and to provide their universal Ad Id. This ensures that the ads delivered are compliant with the demographic viewing content, and that the ads are not misleading, harmful, or offensive. |
| Universal Ad-ID Authority |
Enter your unique identifier provided by either Ad-ID or ClearCast. You will see a dropdown menu that allows you to select between Ad-ID, ClearCast, and Disabled. Disabled can be selected if the country you are in does not have any required identifier.
Ad-ID is the advertising industry standard unique identifier for all commercial assets airing in the United States: ClearCast is the advertising industry standard unique identifier for all commercial assets airing in the United Kingdom: |
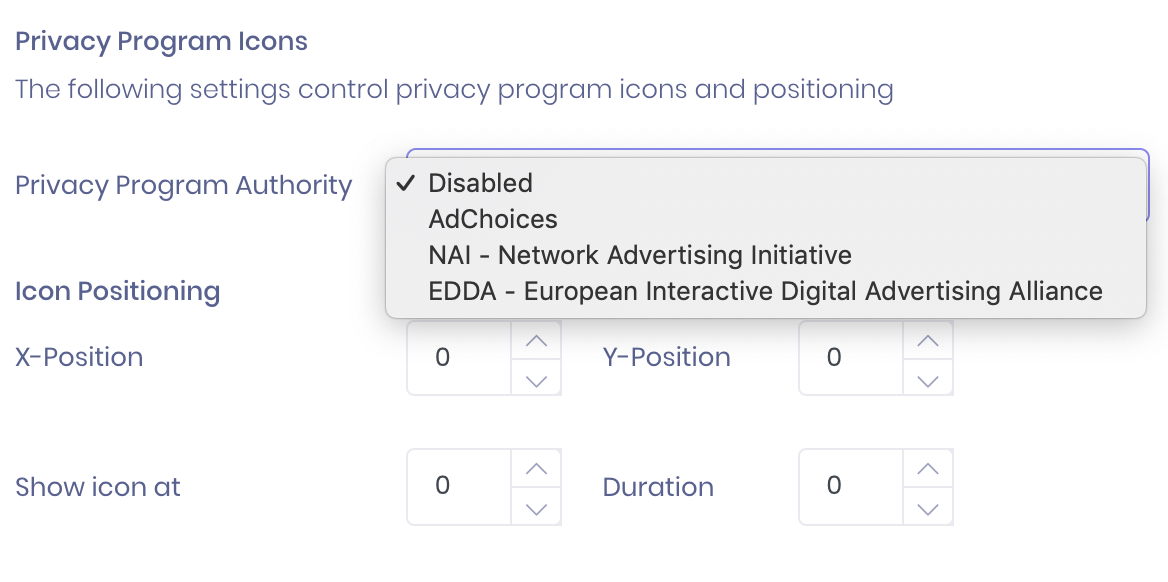
| Privacy Program Icons |
The following settings control privacy program icons and positioning. |
| Privacy Program Authority |
Select from Disabled, AdChoices, NAI, or EDDA.
If Disabled is selected, only the ad you have uploaded will play. No privacy program icons will be shown. More information on this can be found below. |
| Icon Positioning |
Customize the location and placement of your privacy program icons. X position, Y position, show icon at, and duration. |
Privacy Program Authority
AdChoices

If you have multiple ads in an ad pod, you will be offered the choice of which ad to play. Advertising based on your likely interests gives you more relevant ads and offers, helps pay for the online content and services you enjoy, and provides information about the ad server and data providers used to select the Ad:
https://youradchoices.com/
NAI- Network Advertising Initiative

A Code requiring notice and choice with respect to Personalized Advertising. Limits are places on the types of data that member companies can use for advertising purposes, as well as restrictions on member companies’ collection, use, and transfer of data used for Personalized Advertising.
https://www.networkadvertising.org/
EDDA- European Interactive Digital Advertising Alliance

EDAA created YourOnlineChoices.eu, a consumer-facing website, to ensure that companies have the means necessary to provide consumers with greater transparency, choice and control over Online Behavioral Advertising (OBA).
https://www.edaa.eu/
- Once you have finished adjusting the Advanced Settings, click the "Closed Captions" tab to add optional Closed Captions to your VAST ad.
How to Add Closed Captions to the VAST Ad Unit
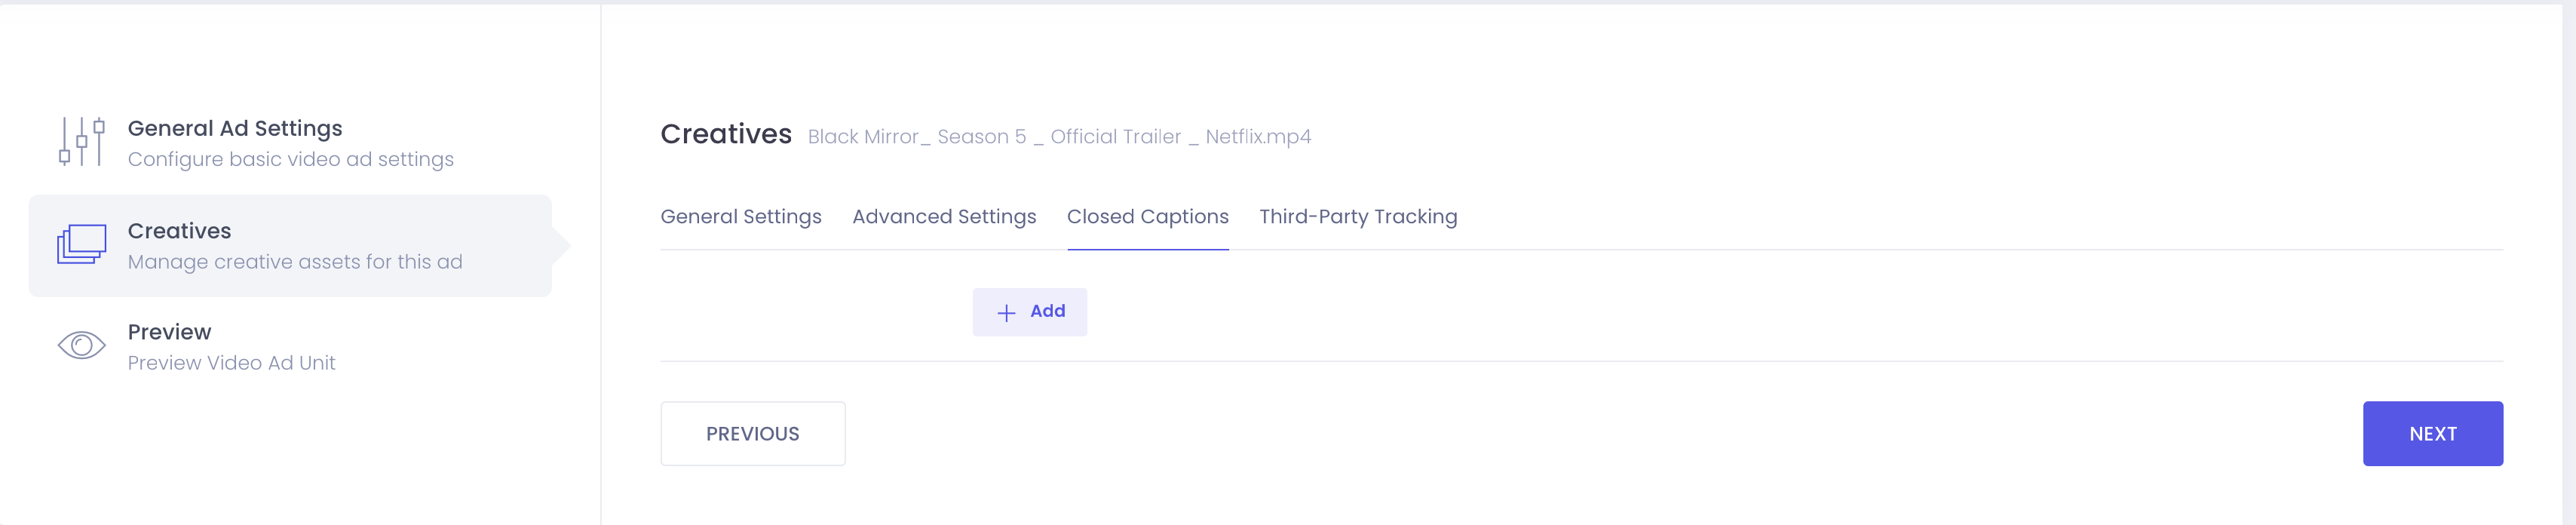
- To add closed captioning, click the "Add" button:

- Once you click "Add," this screen will appear:
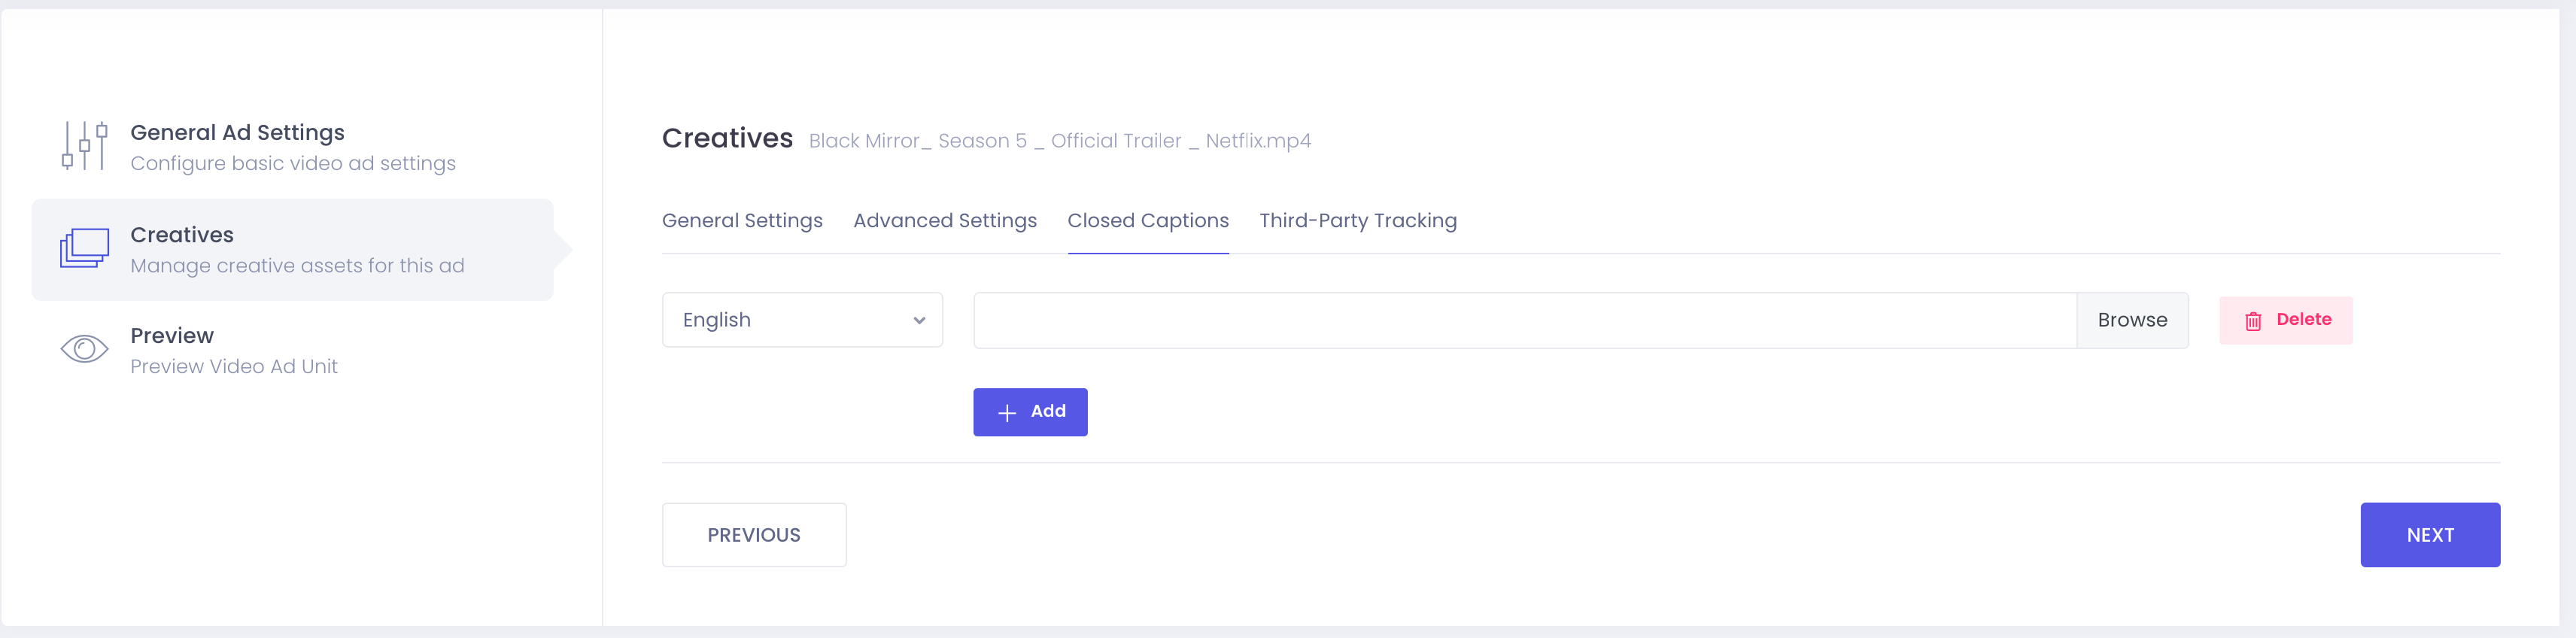
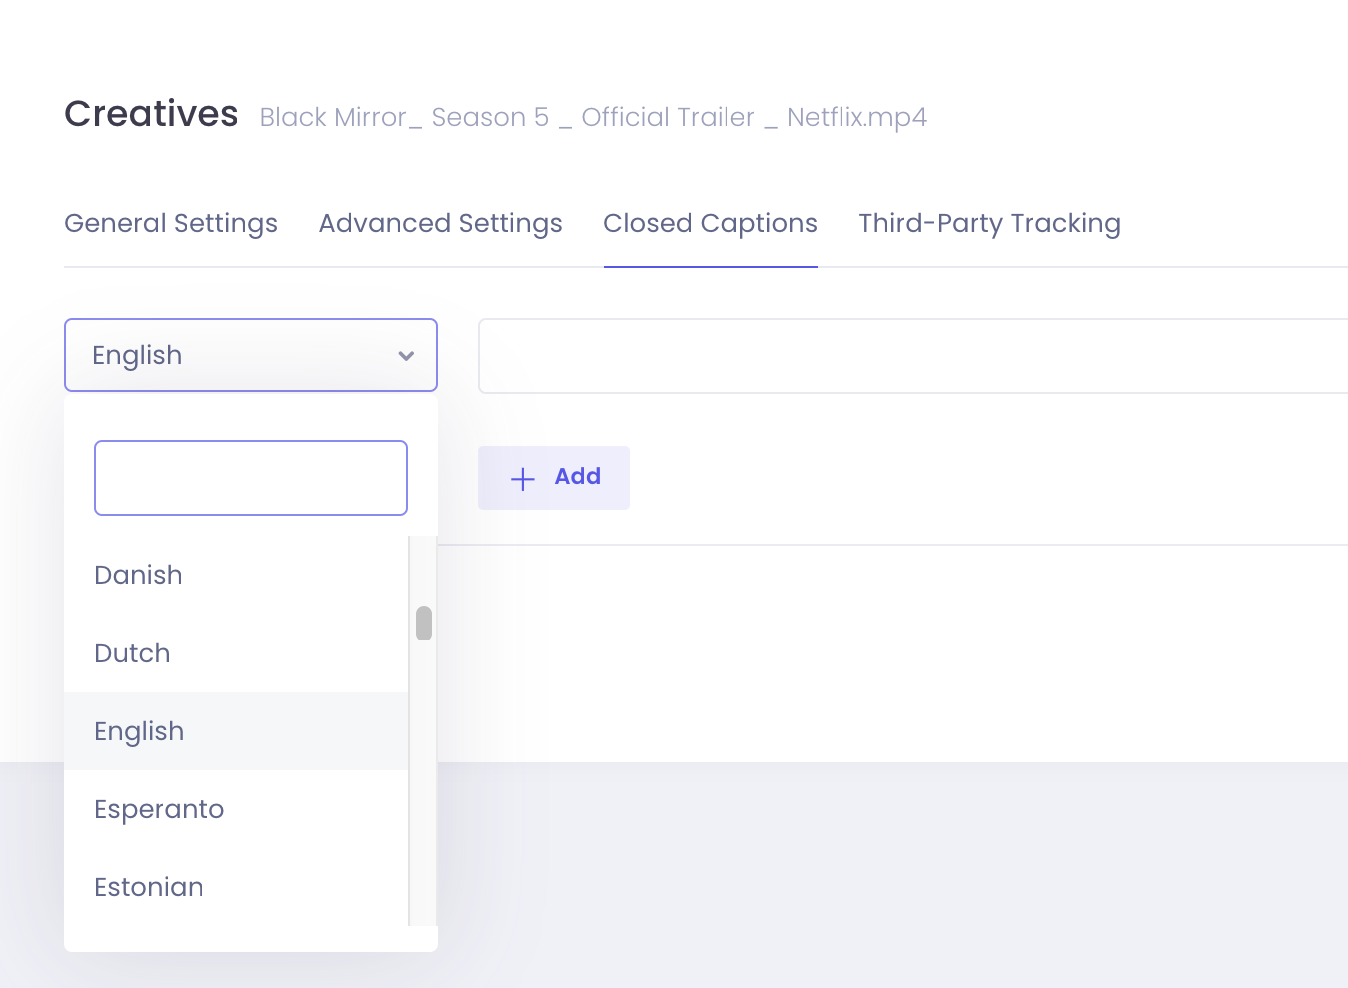
- Select the language for your closed caption files, by clicking on the dropdown arrow:
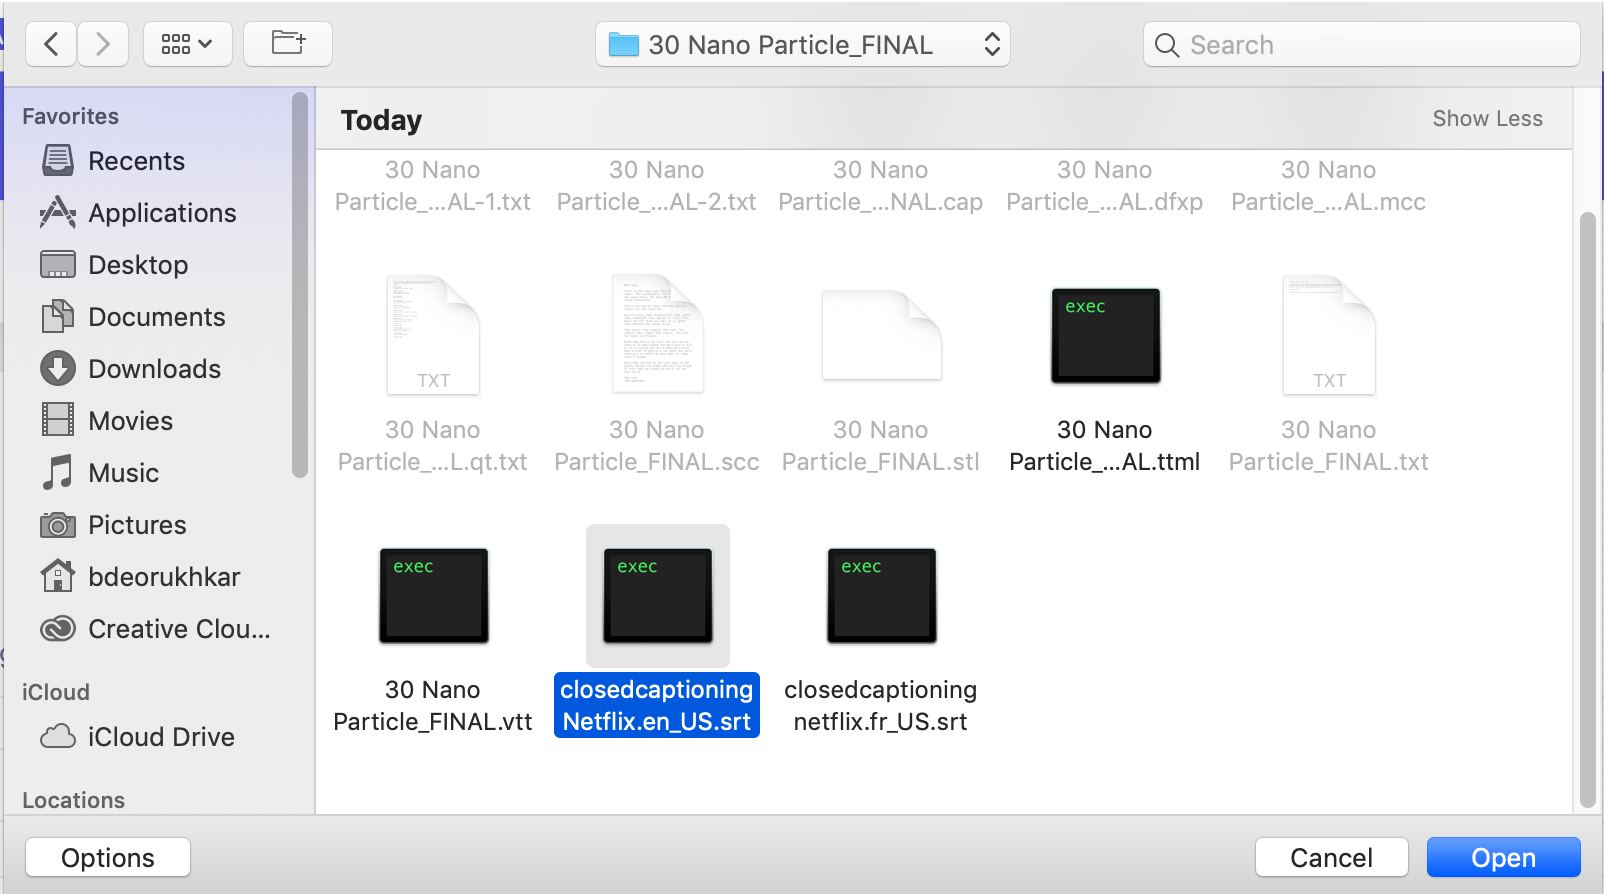
- Select "Browse" on the righthand side, which will lead to your "finder" or "file explorer" window. Locate the desired file and click "open":
- You will see your caption file has been added:

- You will also see a confirmation on the bottom righthand side that your caption file was successfully uploaded:

- If you have added captions in multiple languages, you will see them listed below:

- Once you have finished adjusting the Advanced Settings, click the "Third-Party Tracking" tab to add optional Third-Party Tracking to your VAST ad. Or, if you do not wish to add Third-Party tracking, click "Next" to navigate to the preview screen.
How to Add Third Party Tracking to the VAST Ad Unit
This section will walk through the different tracking options for playback tracking and player interaction tracking.
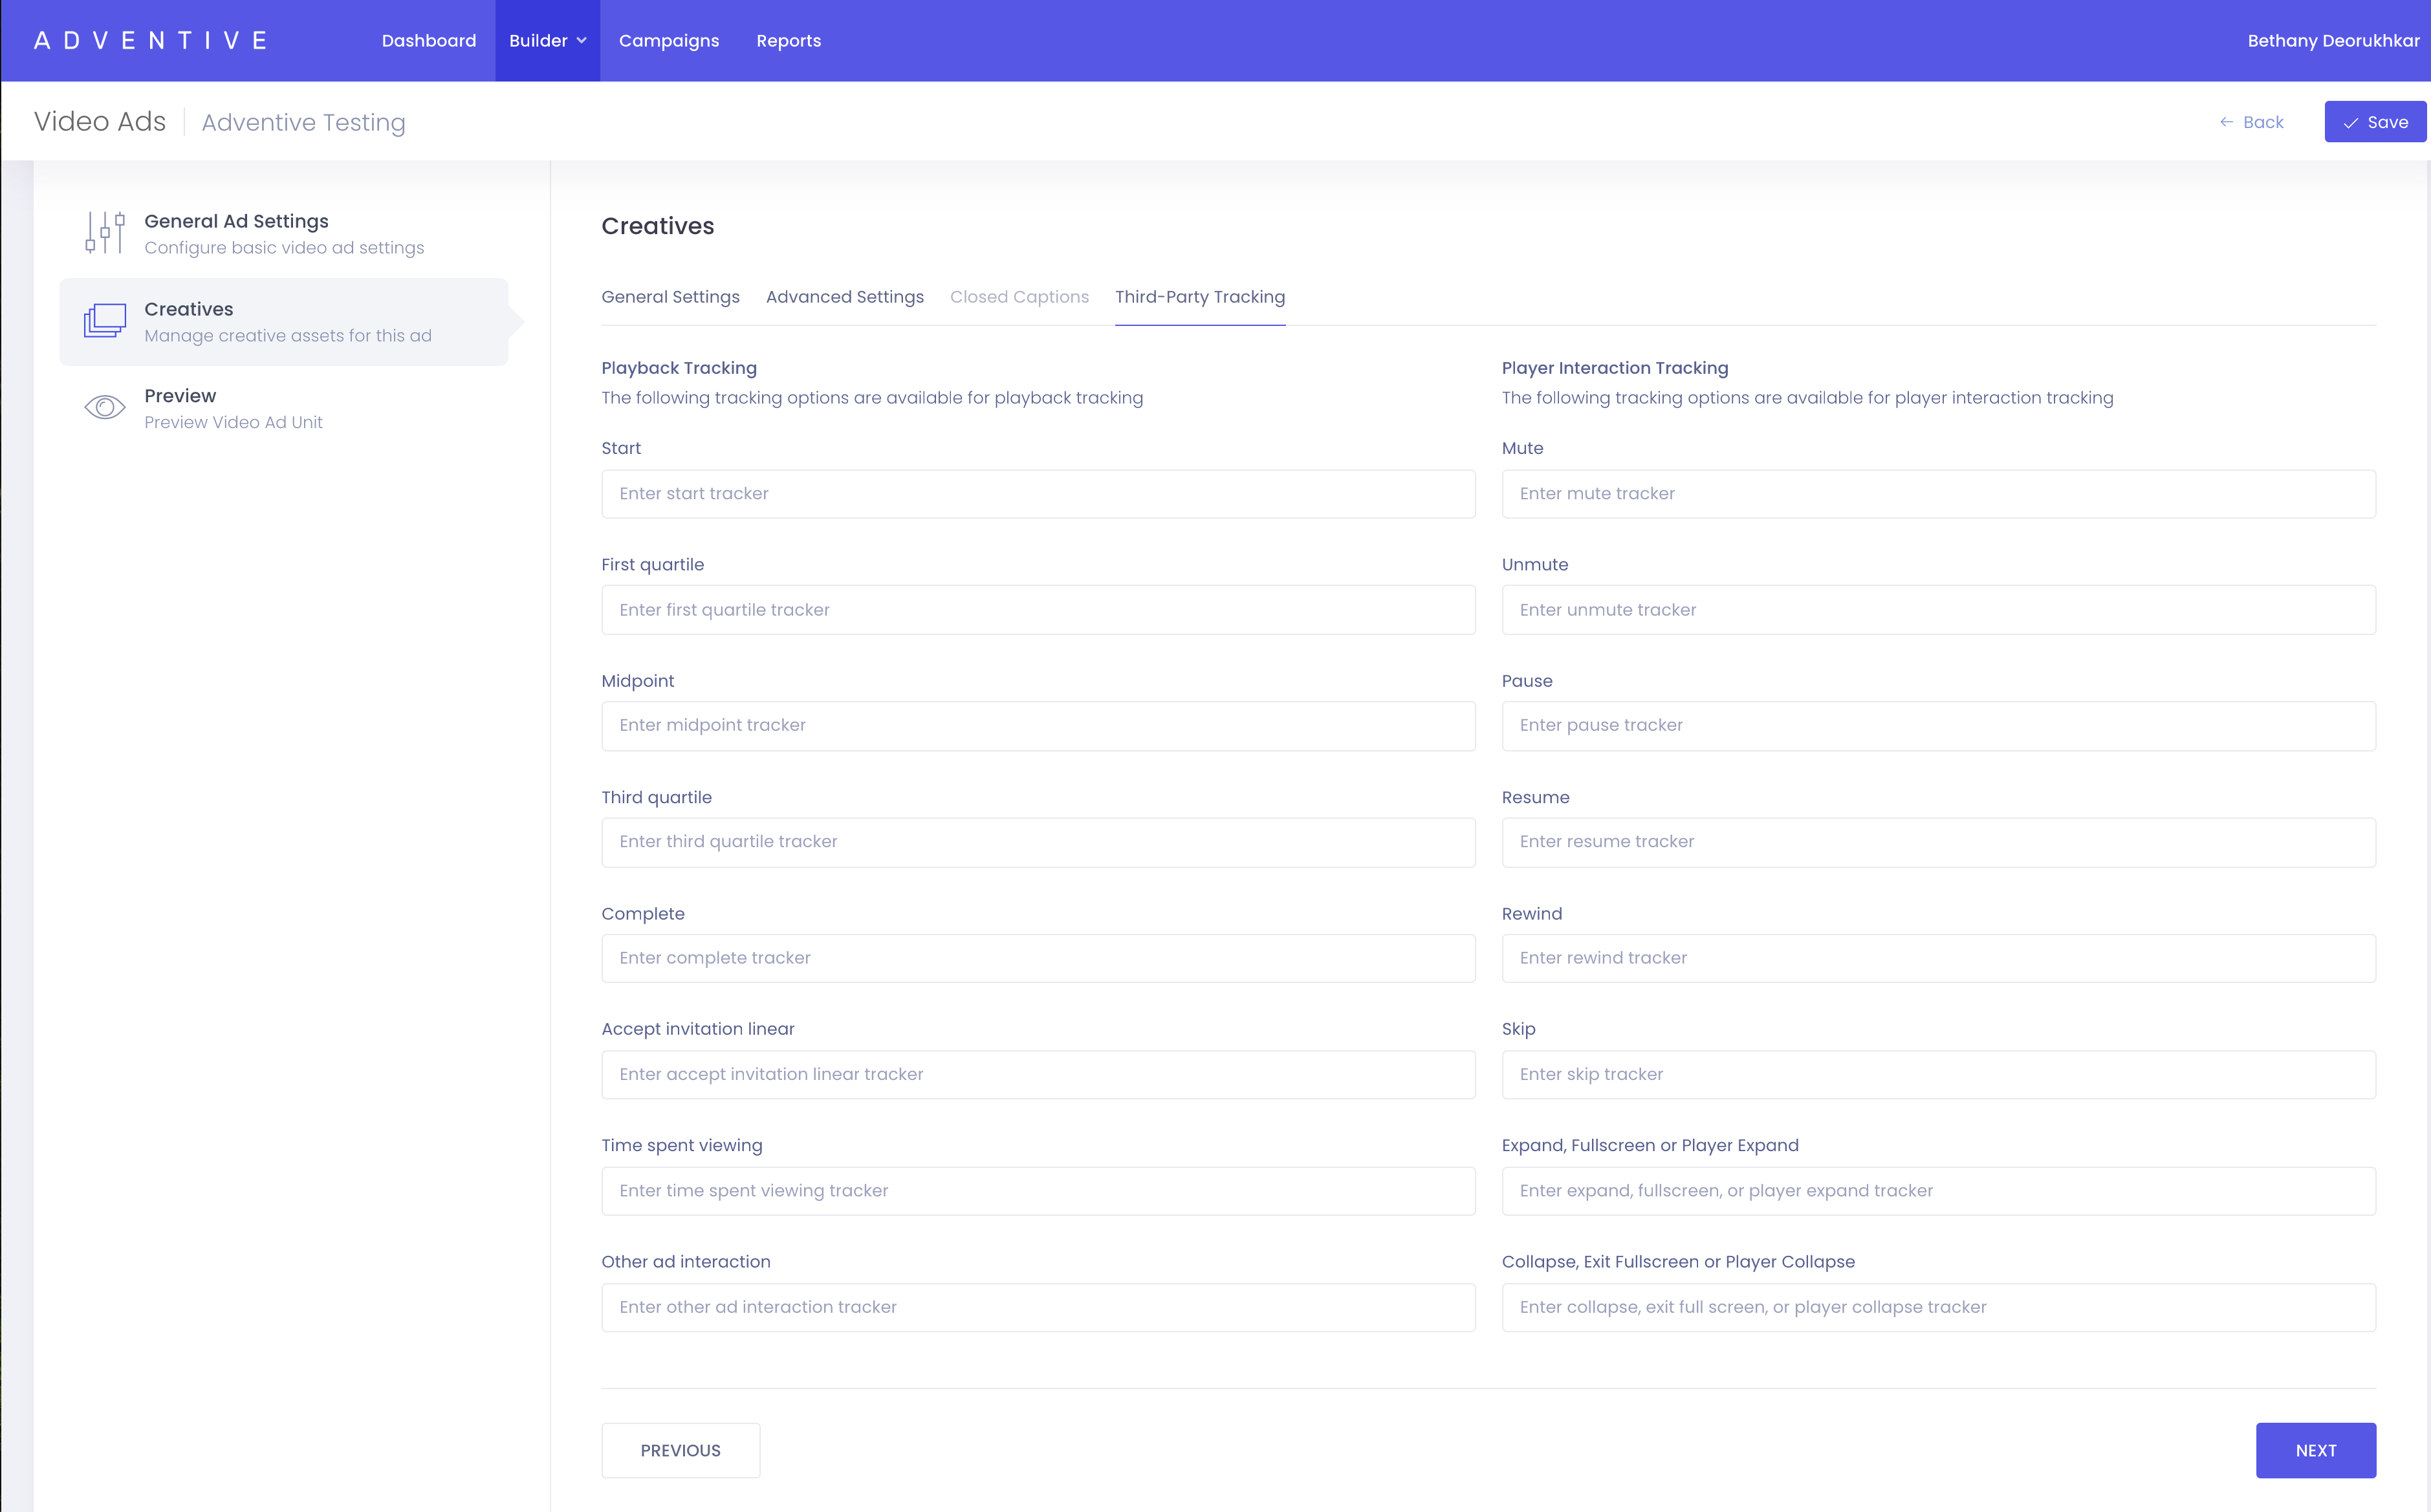
Adventive automatically tracks the following metrics through our analytics and reporting, however users also have the ability to add third-party tracking for the following analytics:
| Playback Tracking | |
| Start | This event is used to indicate that an individual creative within the ad was loaded and playback began. As with creativeView, this event is another way of tracking creative playback. |
| First Quartile | The creative played continuously for at least 25% of the total duration at normal speed. |
| Midpoint | The creative played continuously for at least 50% of the total duration at normal speed. |
| Third Quartile |
The creative played continuously for at least 75% of the duration at normal speed. |
| Complete | The creative was played to the end at normal speed so that 100% of the creative was played. |
| Accept Invitation Linear | The user activated a control that launched an additional portion of the linear creative. |
| Time Spent Viewing | Amount of video viewed at normal speed in seconds, or other appropriate time-based units. If a rewind event occurs during play, time spent viewing may be calculated on total amount of video viewed at normal speed, which may include additional amounts of video viewed after rewinding. |
| Other Ad Interaction | An optional metric that can captures all other user interactions under one metric such as hover-overs, or custom clicks. It should NOT replace clickthrough events or other existing events like mute, unmute, pause, etc. |
| Player Interaction Tracking | |
| Mute | The user activated the mute control and muted the creative. |
| Unmute | The user activated the mute control and unmuted the creative. |
| Pause |
The user clicked the pause control and stopped the creative. |
| Resume | The user activated the resume control after the creative had been stopped or paused. |
| Rewind | The user activated the rewind control to access a previous point in the creative timeline. |
| Skip | The user activated a skip control to skip the creative, which is a different control than the one used to close the creative. |
| Expand, Fullscreen, or Player Expand | The user activated a control to extend the player to a larger size. |
| Collapse, Exit Fullscreen, or Player Collapse | The user activated a control to reduce player to a smaller size. |
- Once you have finished implementing Third-Party Tracking, click "Next" to navigate to the preview screen:

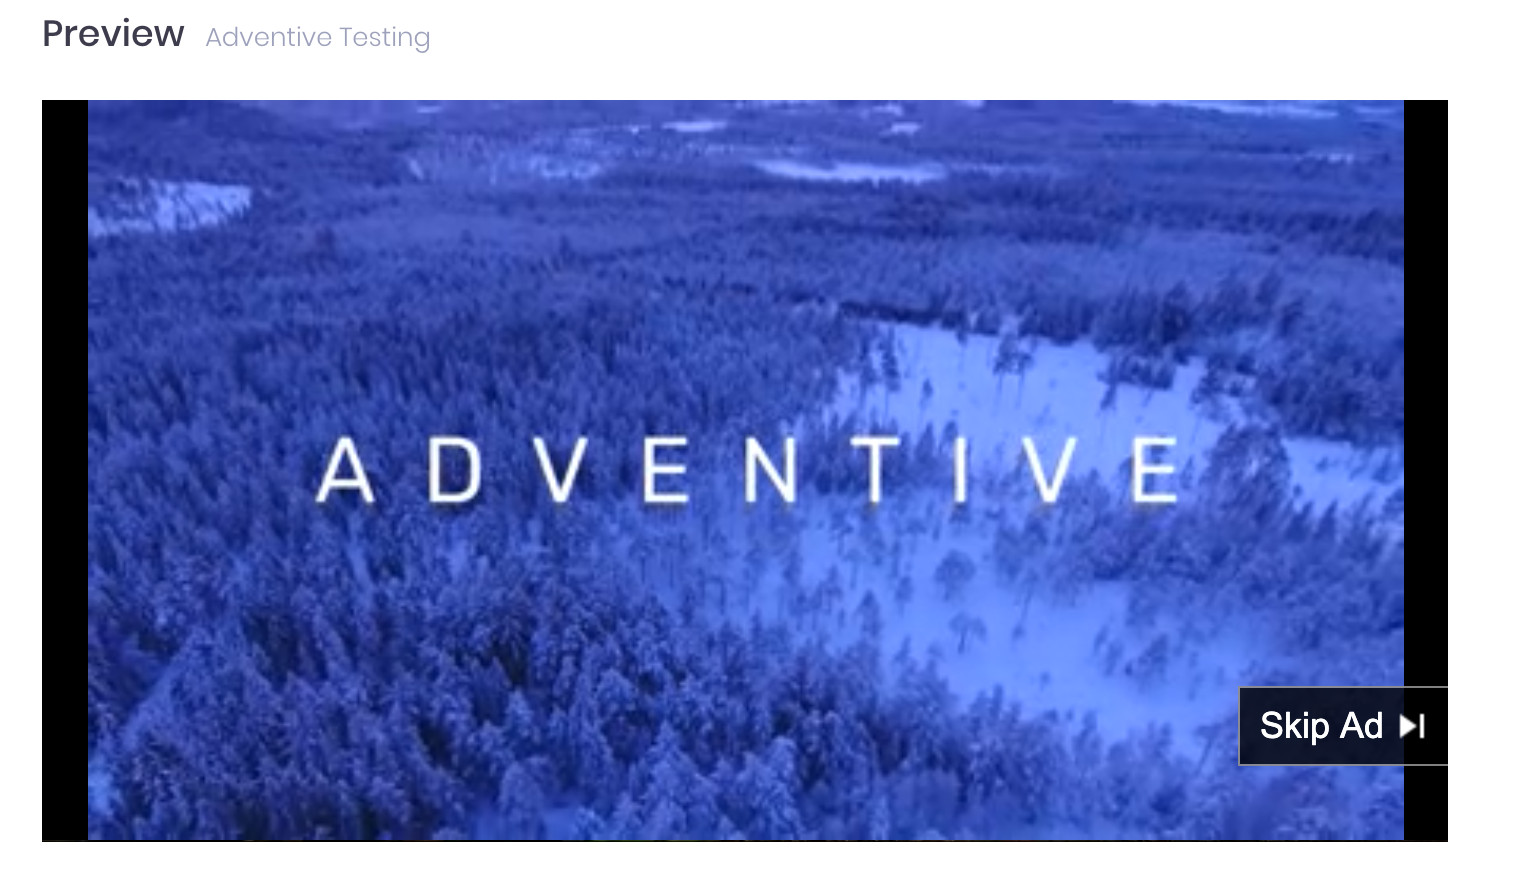
How to Preview the VAST Ad Unit
- Click the Preview tab, and your ad will be shown along with a demo video:
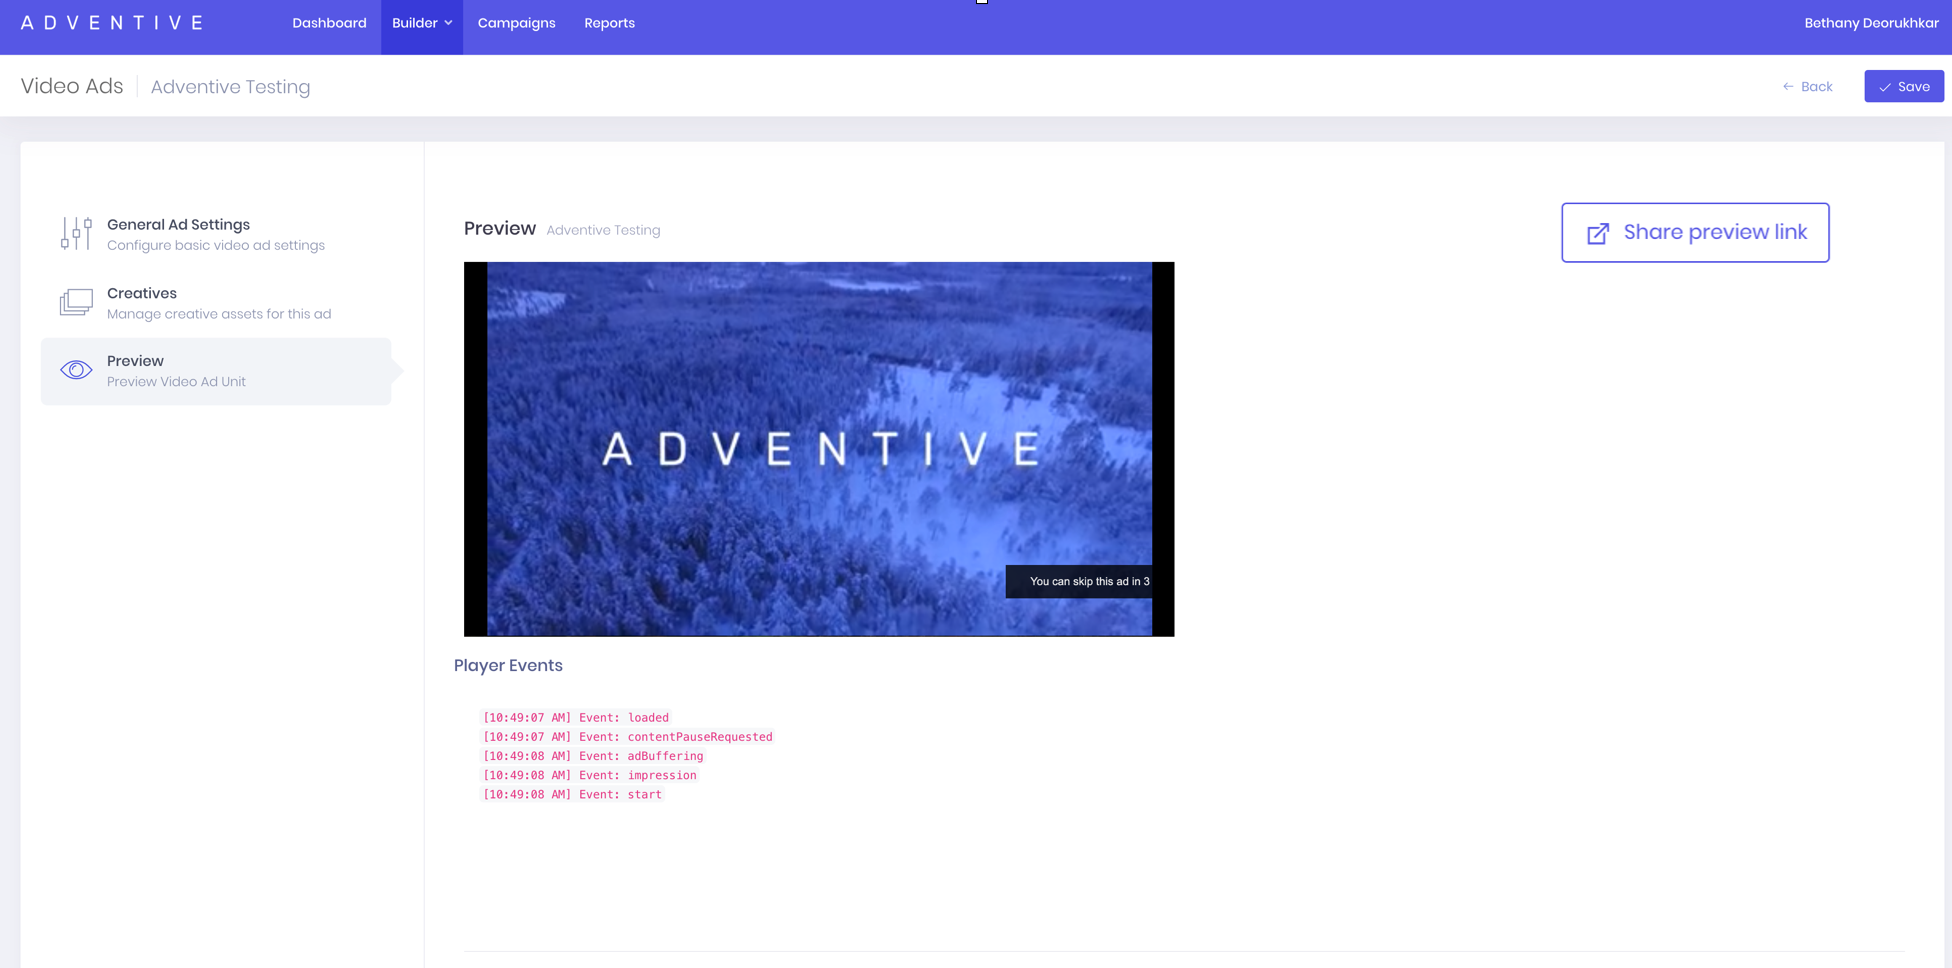
- If you have set your ad to be skippable, you will see the "Skip Ad" button appear in the bottom righthand corner:
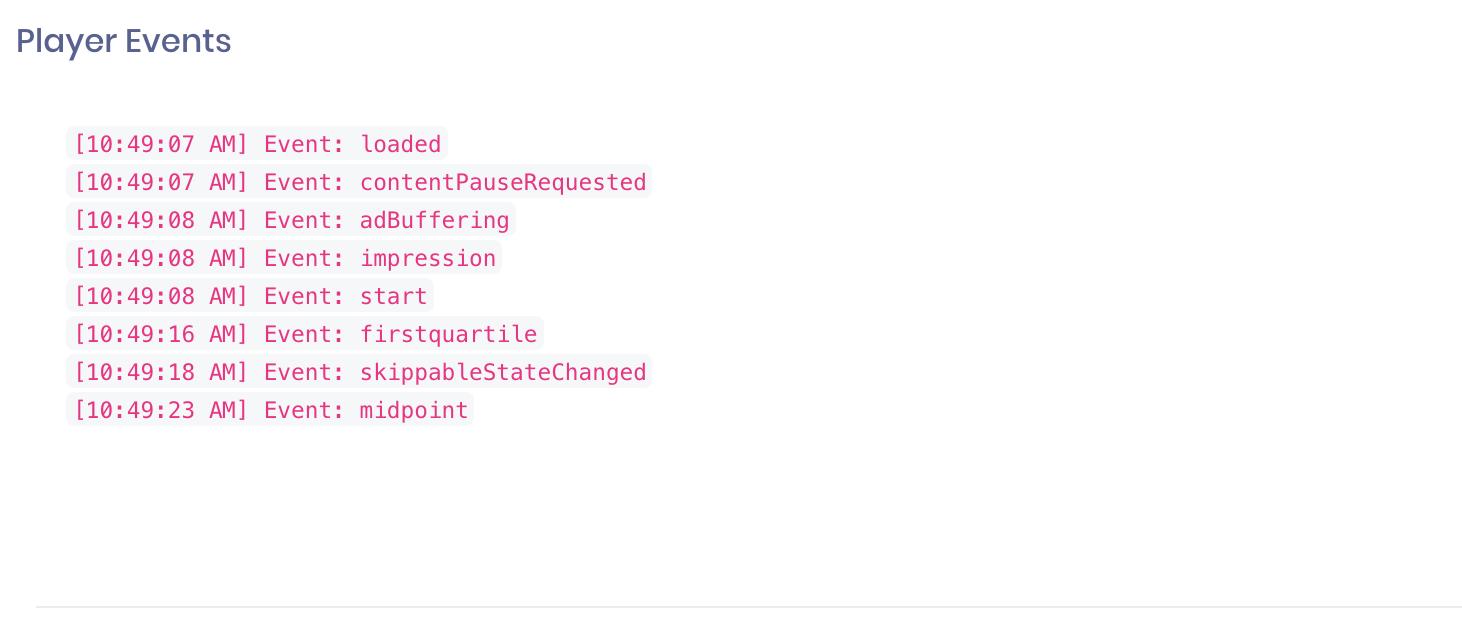
- Player Events shows tracking information based on your creative, including quartile views, impressions, and play/pause:
- Once you have finished creating your VAST video ad, be sure to Save.
- The next step will be to set up your campaign, and add your VAST Video.
Our article Creating, Editing and Managing Campaigns will provide a step by step process to building your campaign.
How to Add a VAST Ad Creative to a Campaign
Please follow the step-by-step instructions in our article Creating, Editing and Managing Campaigns to create your campaign, and add sites and placements.
Once you’ve added a placement to your site within a campaign, you can now add ad units.
- There are three ways to add a new ad unit to a placement. Click the Add Ad Units button directly below the new placement, click the plus sign icon
 located to the right of the placement name or select Add Ad Units from the Placement Actions dropdown menu:
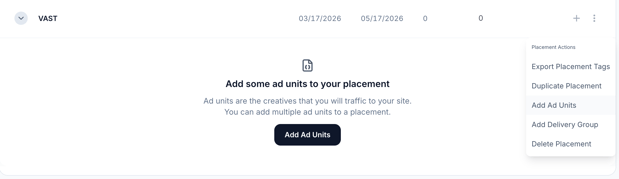
- A list of your ad creatives will open in a popup window. The 2 dropdown menus in the upper right hand corner of the window allows you to choose sorting options and creative type (Rich Media, VAST, Image File, All):

Rich Media files – files that include advanced features such as video, audio, animations, or any other elements that engage a viewer.
VAST - VAST videos that were created within the VAST Ad builder.
Image Files – Static images (any image file - png, jpg or gif) uploaded to assets will populate. Image files can have one click URL assigned, but allow for multiple impression trackers. - Select VAST to view all existing VAST Ads within your current advertiser, as well as a preview image on the lefthand side:
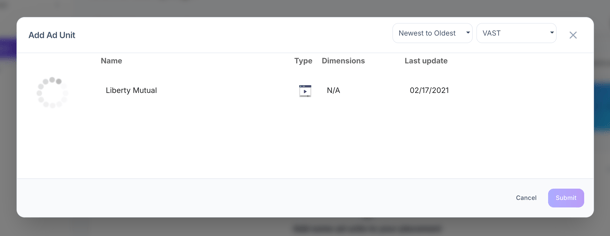
- Click to select the VAST ad units you want to add to the campaign. To unselect an ad, just click it again. Click Submit to add your ad units to the campaign placement.
- Ad units will be displayed under your placement as single line items. The ad name and click-through URL are inline-editable and can be updated by clicking on the underlined text. The creative name is not editable as it represents the creative asset to be displayed.
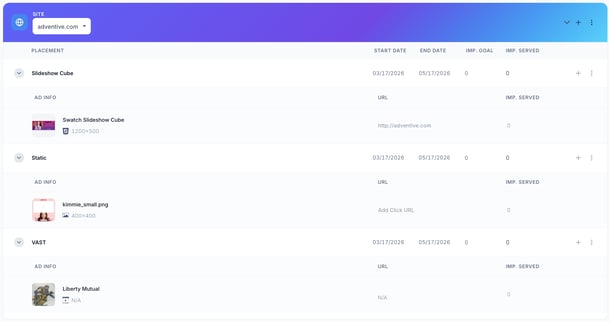
- The type of file/dimensions will display, along with the click through URL inserted in the Instream Video Ad Builder.
Image file/ Static image:
Rich Media file:
VAST file:
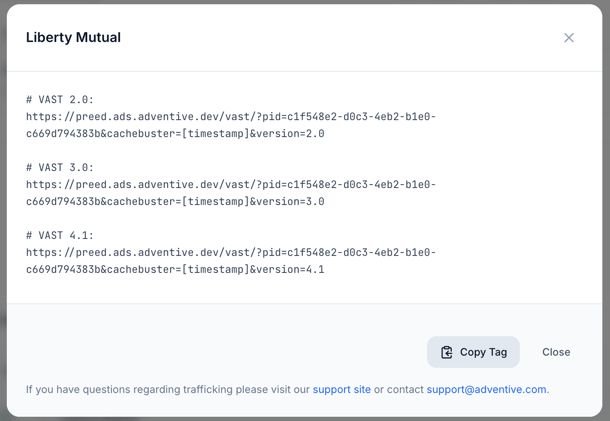
How to View and Export VAST Tags for Trafficking
View the VAST Tag
-
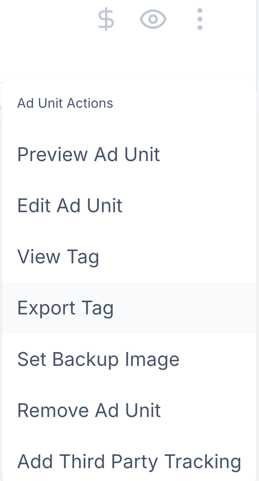
To view the VAST tag, go to the Ad Unit Actions menu, which can be accessed through by hovering over the right side of the ad unit line item. Select the three vertical dots
 symbol, then click View Tag:
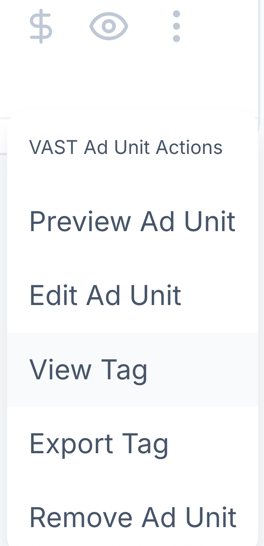
Export VAST Tags
You can also export a full tag sheet containing your desired ads. Adventive’s tag generator allows you to export the right first-party tag format, ensuring ads are distributed with the appropriate tag settings.
Tags can be exported at the Campaign, Site, Placement or ad unit/ad group level.
See our article Exporting Ad Tags for more details.
- To export all tags for the placement, go to the top of the placement and locate the Placement Actions Menu icon
 to the right of the placement within the campaign.
 - You can also go directly to the right of the individual ad unit, if you only require tags for an individual ad unit. To do this, you'll click the Ad Unit Actions Menu.


- To export a tag sheet, select Export Tag.
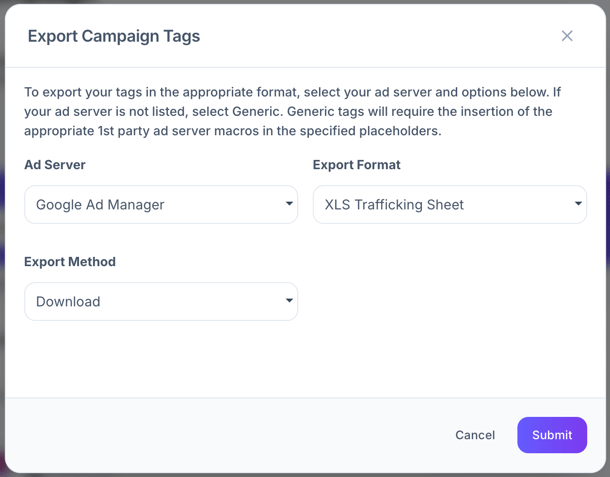
- This will prompt you to select your first party ad server, your export format, and your export method. Once you have selected these, press submit.
- A spreadsheet will download to your computer if you have selected XLS Trafficking sheet and "Download" as the export method:
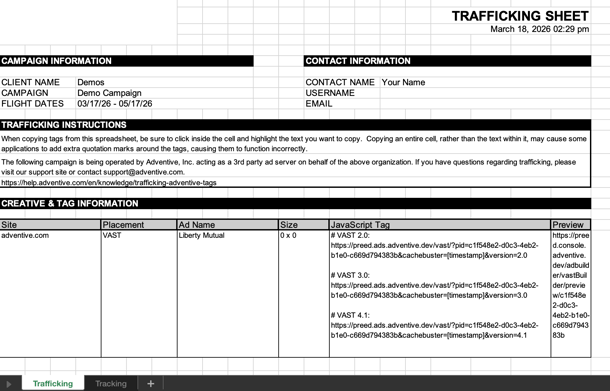
- As you will see, multiple VAST tags will generate for version 2.0, 3.0, and 4.1:
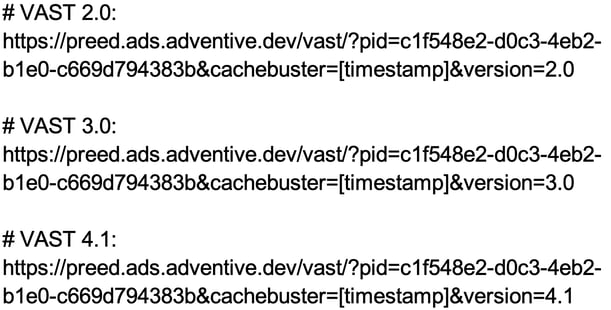
- Proceed to your player, and embed the desired code (2.0, 3.0, or 4.1).
Adventive's VAST Video Ad Builder is compatible with all players that support VAST 2.0, 3.1, or 4.1 specification.
How to Edit, Preview, and Delete an Existing VAST Ad Unit
- Navigate back to the main screen of the VAST Ad Builder by clicking the Create Ad menu in the left hand menu bar and selecting Instream Video Ad Builder:
- Existing VAST Ad creatives will display here:

-
You will see the “Actions menu” next to any existing VAST Ads:

-
Click on the pencil and paper icon to edit the existing ad creative:

-
The magnifying glass icon will take you to the console preview link:


-
The trashcan icon will allow you to delete the ad, and will ask for confirmation if you choose to do so:

