In this article, you will learn:
How to Add Impression Tracking
How to Add Impression Tracking
Adventive supports a wide variety of third-party tracking pixels and scripts specifically to enable those third-parties to corroborate Adventive or the Publishers reporting to the Advertiser.
Below, you will find a step by step guide to implementing third-party impression tracking.
- Locate and edit the campaign you are looking to add tracking to. For more information on creating campaigns, see our article Creating, editing and managing campaigns.
- Go into the campaign and navigate to the ad unit that you are looking to add an Impression tracker to. Click the 3 dots to the right of the ad (be sure you click at the ad level):

- Upon clicking the 3 dots, the below dropdown will appear – select “Add Third Party Tracking”:

- The following screen will appear:

- Click the "Impression Tracking" tab. If there is no Impression tracker currently placed, a notification will come up for you to “click” to add one (or click the “+” symbol top right).

- For the "Tracker Type", if the tracker is a pixel, select "pixel" from the list. You can also choose to upload a "Script" tracker, or a DCM INS tag (* instructions for INS below - and more info here).

- Once the type is selected, copy and paste the Impression tracker into the “Tracking URL” input box (the description field is optional).

- Click Submit in the bottom right – or, you can now add more Impression Trackers, Engagement Trackers, or Viewability Trackers.
* Note - If you are placing a DCM INS Impression Tracker - select "INS" as the "Tracking Type":
- Copy and paste the entire INS Impression tracker into the “Tracking URL” input box (the description field is optional).

- Click Submit in the bottom right – or, you can now add more Impression Trackers, Engagement Trackers, or Viewability Trackers.
* Note - If the tracker is incomplete/extra characters - a red prompt stating "Invalid Impression tracking URL" will appear. The platform will not allow user to move on to placing other trackers until it is corrected:
- Click Submit to Save.
Additional Notes:
- You can add as many Click Urls, Impression, Engagement and Viewability Tracking as needed per ad before hitting the Submit button in the bottom right corner.
- Adventive embeds Third-Party trackers in the actual ad code (vs appending to the end of the tag), allowing you to update or add tracking at any time without generating new tags or re-trafficking.
- If this is an update to an existing campaign, be sure to Republish the campaign. Click the republish icon at the top of the page to republish all ad units that have been updated. Alternatively, click the republish icon next to the individual ad line items to republish just that particular ad unit.

Updating Trackers/View Trackers
- To make updates to Third Party trackers/or to view, you can re-select “Add Third Party Tracking" next to each ad, and click within the field for the tracker you want to change or view:
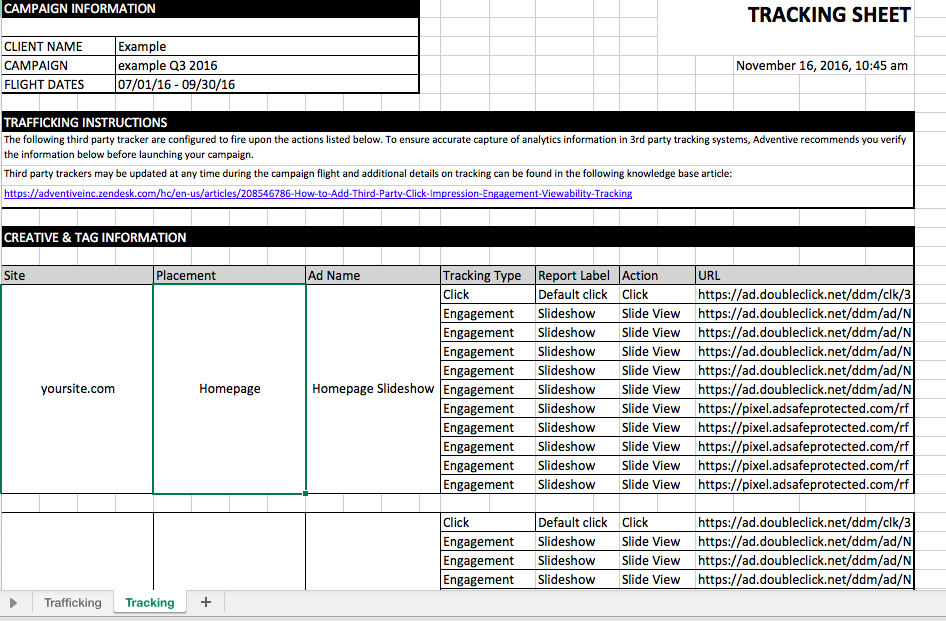
For Bulk Viewing
- When you Export Tags as an Excel file, there will be a tab at the bottom of the Trafficking Sheet downloaded file called "Tracking" which will show each ad's corresponding trackers: